This page includes:
About website rules
This page describes the Website Rules tab inside each policy. For details on policies, see Policies. The Website Rules tab enables you to define rules for specific domains and categories. This helps to prevent the loss of data [DLP] and enables you to implement URL filtering.
To open the Website Rules tab:
-
In the Advanced Browser Security Console, select Policies.
-
Open the required policy, and then click the Website Rules tab.
About website access
When the ABS extension is active, access to websites is determined by detection settings and website rules:
|
Detection settings |
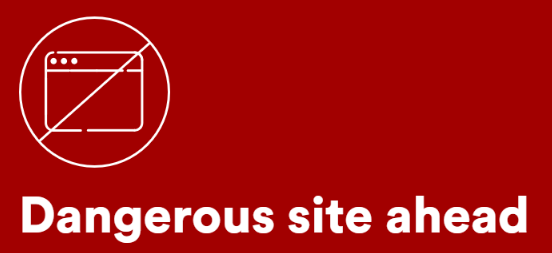
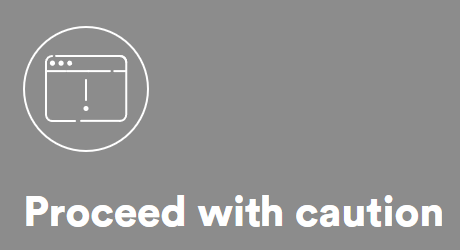
Affect detection only Determine whether [and how] to apply the Perception Point X‑Ray malicious detection mechanisms when a user tries to access a website. These detection mechanisms may prevent access to specified sites - depending on the detected maliciousness of the site. For example, the Warn website detection mode warns users before they access potentially malicious sites, but doesn't prevent access. In contrast, the Block website detection mode prevents users from accessing potentially malicious sites.
For details on detection settings, see Detection Settings.
|
|
|
Website rules |
Based on the organization policy, including browser governance and DLP Determine whether a user can access a website, based on the policy that is set by the organization. For example, you can create a website rule that will prevent users from accessing websites that are categorized as "Adult Content".
|
Detection settings vs Website rules
|
Scenario 1 |
|
|
Scenario 2 |
|
Website rule options
You can include the options below inside each website rule.
|
Note: Some of the options below may not be available for category-based and group-based rules. |
For more information, see About website access above. Attempts to access blocked or "warned" domains or categories are logged in the extension activity table. For details, see Extension Activity.
|
||||||||||||||
|
|
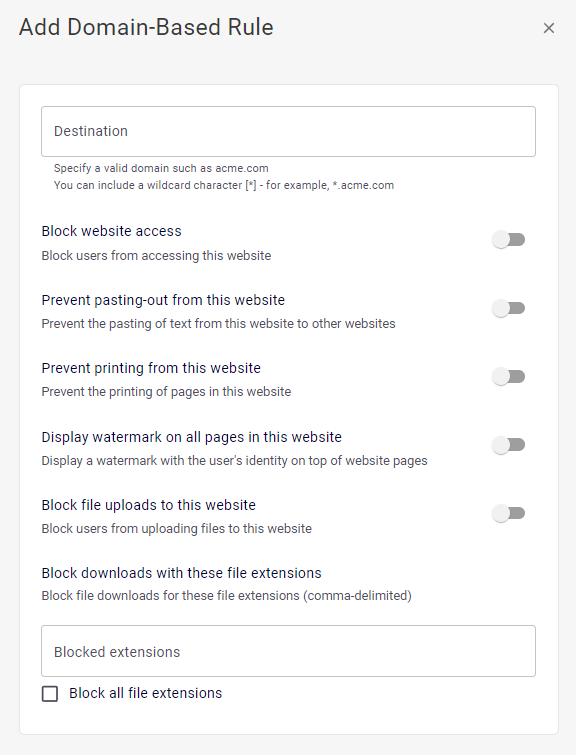
The specified custom message will appear when a user tries to access a domain [or a website in a category] that is blocked or that has been configured to trigger a warning message when access is attempted. A custom message can be useful for presenting specific warnings or corporate policy information related to a specific website (for example, a Generative AI website) or category. If no text is specified, then the default message text will be displayed.
|
|||||||||||||
|
Prevents users from copying text from the specified domain, and then pasting the text into another website or into an application. For example, you can prevent users from copying text from the acme.com domain and then pasting the text into another website or into an application such as WordPad.
|
||||||||||||||
|
By default, printing is allowed from all domains. This setting lets you prevent [block] printing from the specified domain [or website in a specified category]. For example, you can prevent printing from acme.com.
|
||||||||||||||
|
Shows a watermark in the browser UI when visiting the specified domain [or website in a specified category]. The watermark will be visible in screen captures of the browser UI - thereby helping to deter information leakage. By default, each watermark consists of multiple instances of the user's email address.
|
||||||||||||||
|
Prevents uploading files to the specified domain [or website in a specified category].
|
||||||||||||||
|
Blurs all pages in the specified domain or category when these pages are not in focus. This helps to limit information leakage to nearby people who should not have access to information in these websites. This feature is also referred to as an "inactivity mask".
|
||||||||||||||
|
Sensitive data detection |
Warns end-users when they input sensitive data into specified websites. Warnings about sensitive data input are logged in the extension activity table. For details, see Extension Activity. For additional information about warning end-users when they input sensitive data into websites, see Detecting input of sensitive data into websites.
|
|||||||||||||
|
Prevents downloading of files with specified extensions - from the specified domain [or website in a specified category].
|
||||||||||||||
|
Overrides the file download access mode that is specified in the Detection Settings tab - for the specified destination only. For details on the file download access mode, see Prevent access to downloaded files until the scan is complete. |
||||||||||||||
|

|
Note: In addition to the functionality described in the table above, various advanced features can be used to enhance DLP. Advanced features override any settings included in the table above. When available, the available advanced features are referenced in the table above. |
Adding website rules
|
Note: Changes that you make to the settings in the Website Rules tab may take up to 30 minutes to take effect - after the changes are saved. |
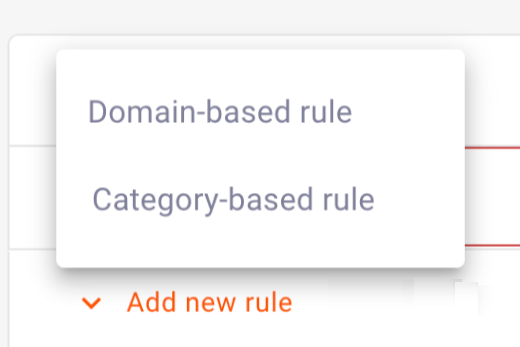
When you add a new rule, you specify if it will be a domain-based rule, a category-based rule, or a group-based rule:
-
Domain-based: The rule applies to a domain that you specify. The domain must be a valid URL domain, such as acme.com. To define a domain, you can include wildcard characters [*] such as *.xyz.com
-
Category-based: The rule applies to a specified category, such as Adult, Drugs, or Generative AI. Advanced Browser Security uses a third-party tool to categorize all websites. When you create a category-based rule, you select the category, and then configure the options that will apply to that category.
Note:
-
If a web-page is blocked by a category-based rule, all "allow" website rules [such as "printing", "uploading files" etc - see Website rule options above] will not be allowed.
-
Attempts to access URLs that are included in a blocked category are logged in the extension activity table. For details, see Extension Activity.
-
Websites that are blocked due to this website setting are not scanned for suspicious content. Consequently, no scan data is displayed in the Scans page in Perception Point X‑Ray.
-
-
Group-based: The rule applies to all the domains that are specified in the selected destination group. For details on destination groups, see Destination Groups [WIP].
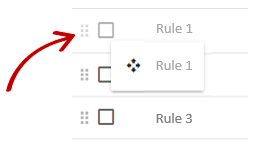
Rule priority
A matching rule that is higher in the list of rules takes precedence over a matching rule that is lower down. For example, if rule #2 allows access to a specific website, and rule #5 prevents access to the same website [even using a category-based rule], access to the website will be allowed.
|
|
 Tip: This functionality enables you to block access to a certain web category, but allow access to a specific website in that category. For example, you could allow access to a specific alcohol-related website [MyAlcohol.com - Rule #1], while preventing access to all other websites that are categorized as "Alcohol and Tobacco" websites [Rule #2].
Drag a rule up or down to change its precedence. Use the drag-and-drop controls on the left of the rules list to move a rule.
Adding domain-based website rules
To add a domain-based website rule:
-
In the Advanced Browser Security console, click Policies, open a rule, and click the Website Rules tab.
-
Click Add new rule, and then select Domain-based rule.

-
In Destination, specify the domain to which the new rule will apply.
 Defining a domain
-
The domain must be a valid URL domain, such as acme.com.
A rule defined with a format like "website.com" will include both "website.com" and "www.website.com"
-
To define a domain, you can include wildcard characters [*]
A domain defined with a format like "*.website.com" will include both "website.com" and any subdomain (such as "www.website.com", "mail.website.com", "support.website.com"...)
-
You can enter a lone wildcard character [*] to represent all domains.
Important: This lone wildcard character functionality is currently applied to File upload actions and the blur feature only - it is ignored by all other action types that are included in the rule.
-
-
Configure the available settings. See Website rule options above for information about each setting.
-
Click Add rule. The new rule is added to the top of the rules list.
Adding category-based website rules
To add category-based website rules:
-
In the Advanced Browser Security console, click Policies, open a rule, and click the Website Rules tab.
-
Click Add new rule, and then select Category-based rule.

-
Select the pre-defined categories that you want to include in the new rule. [You can select multiple categories.]
-
Configure the available settings. See Website rule options above for information about each setting.
Note: The following website rule options are not available for category-based rules:
-
Preventing paste-out
-
File access mode override
-
-
Click Add rule. A new rule for each of the selected categories is added at the bottom of the rules list.
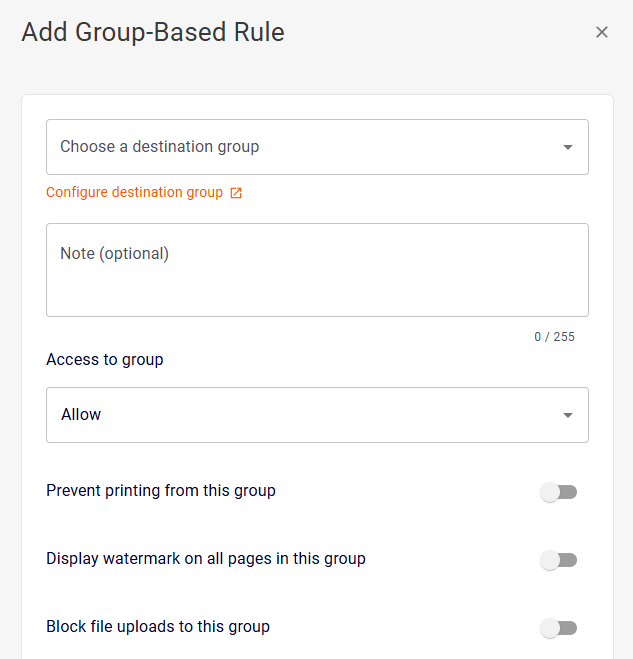
Adding group-based website rules
You can add a group-based rule only if you have at least one destination group already defined. For details on destination groups, see Destination Groups [WIP].
To add a group-based website rule:
-
In the Advanced Browser Security console, click Policies, open a rule, and click the Website Rules tab.
-
Click Add new rule, and then select Group-based rule.

-
In Destination, select the destination group to which the new rule will apply.
-
Configure the available settings. See Website rule options above for information about each setting.
-
Click Add rule. The new rule is added to the top of the rules list.
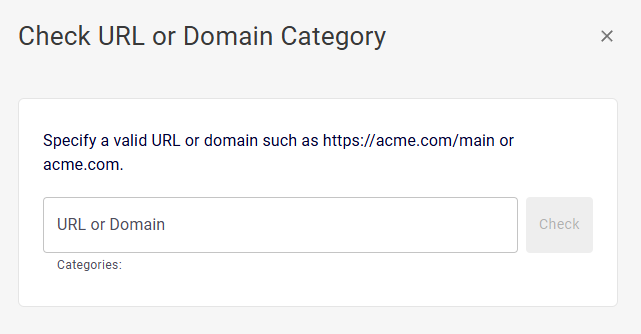
Checking associated categories
You can check which categories are associated with specified URLs or domains. This is useful when you want to add a category to a website rule, but you are not sure what categories are associated with a specific domain.
To check which categories are associated with a specified URL or domain:
-
In the Advanced Browser Security Console, select Policies.
-
Open the required policy, and then click the Website Rules tab.
-
Below the table, click "Check category". The Check URL or domain Category pane opens on the right-side.

Note: If there are no rules defined, then select Add new rule > Check category.
-
Specify a valid URL or domain, and then click Check. The associated categories will appear.
See also:
