This page includes:
About adding a domain
You can add a domain either as part of a new integration or as part of an existing integration:
Adding a domain to a new integration
The required procedures are the same as those that must be performed when you on-board a new integration. For details, see:
|
Integration |
For details, see... |
|---|---|
|
Google Workspace |
|
|
Microsoft 365 - Inline |
|
|
Microsoft 365 - API |
|
|
Microsoft Exchange |
|
|
"Other" email services |
Adding a domain to an existing integration
You can add a domain to an existing integration as described in the procedures below:
Adding a domain to an existing Microsoft 365 Inline integration
|
Note: You can include only a single Microsoft 365 tenant in any "Acronis Email Security" organization. To add multiple Microsoft 365 tenants, create additional organizations in "Acronis Email Security", and then configure the required Microsoft 365 tenants and domains in those organizations. |
To add a new domain to an existing Microsoft 365 Inline integration, perform the following 4 steps:
-
Select Settings > Bundles and Channels.
-
Under Enabled Channels, locate Email Service, and then click Email service configuration [
 ] on the right.
If the "Add and Configure Services" dialog box appears, click "Add a new email service".

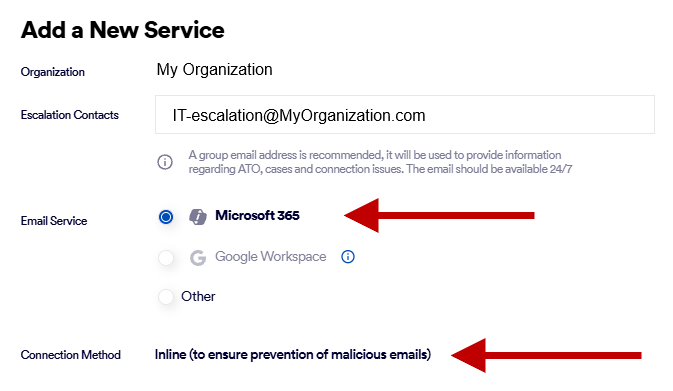
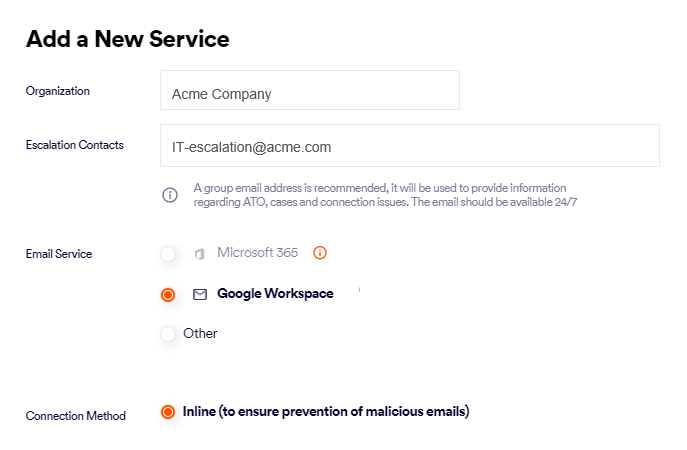
The "Add a New Service" dialog box opens.
-
Make sure that Email Service > Microsoft 365 is selected.
-
Make sure that Connection Method > Inline appears.
-
-
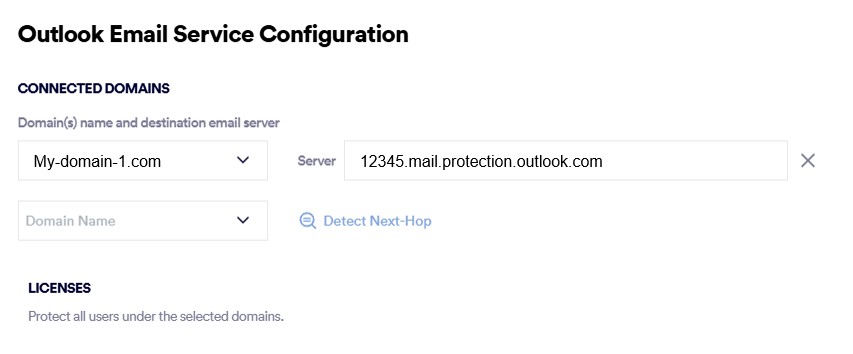
Click Next. The Outlook Email Service Configuration dialog box opens. The currently configured [protected] domains are shown.
-
Under Connected Domains, on the right of Domain Name, click the down-arrow, and select the domain to add for protection.
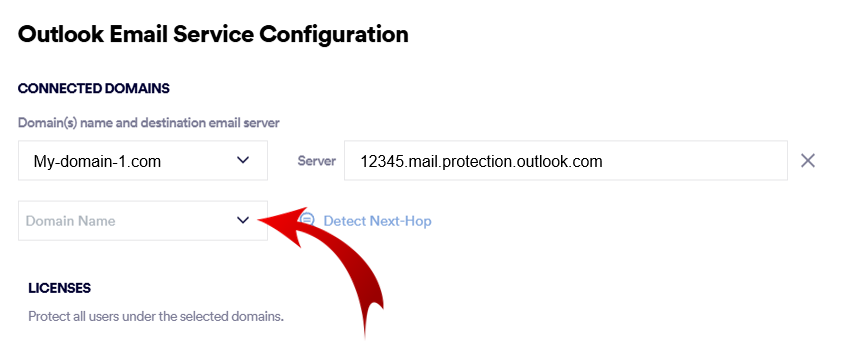
Note: The list of domains shows only the domains that were detected in the Microsoft 365 tenant that is associated with the current "Acronis Email Security" organization - and only those domains that are not already configured to be protected. To add domains that are not included in the current Microsoft 365 tenant, create a new organization in "Acronis Email Security", and then configure the required Microsoft 365 tenant and domains in that organization.
-
Click Detect Next-Hop to the right of the newly selected domain.
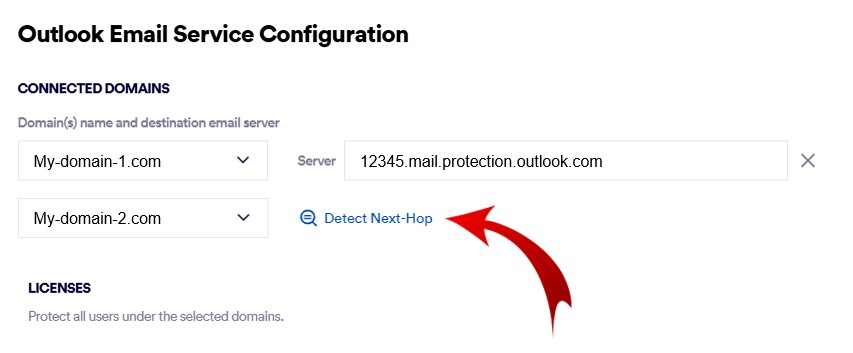
This should populate the Server field with a server address. This is the address to which mail will be sent after it has been scanned and marked as being clean.
The required Server value above is a server in your domain - as it appears in the MX record.
Important: Do not enter a value such as smtp.office365.com or outlook.office365.com or smtp.gmail.com.
 Checking your SMTP server manually
You can perform the lookup procedure below to check that the SMTP server that appears is correct:
-
-
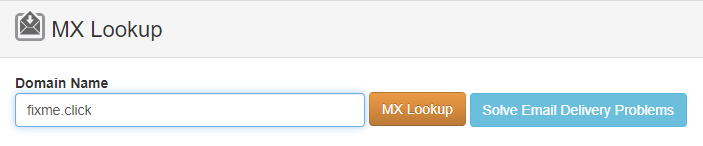
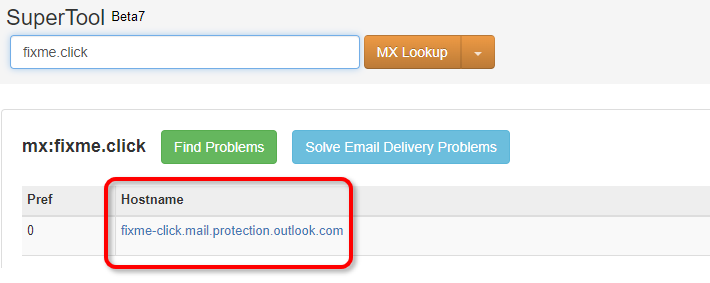
In Domain Name, enter your domain name - and then click MX Lookup.
Your required SMTP server will appear under Hostname.
-
-
-
[Optional] Click Add Domain - if you want to add more than 1 domain - and enter the required details.
-
Licenses: Specify one of the following options:
-
Number of accounts: All users in your G-Suite or Microsoft 365 account will be protected by "Acronis Email Security". The number of users protected each month is used for billing purposes. This option is recommended for better protection.
-
Number of licenses: Specify the number of users that will be protected by "Acronis Email Security" on a monthly basis. This number will be used for billing purposes. You'll need to specify the list of protected users - in Step 3 of the email service connection procedure. [Note: This option is available only for Google Workspace and Microsoft 365 connections - not for Exchange or "other" connections.]
-
-
Click Next.
The "Add TXT Records" dialog box opens.
This dialog box includes the TXT names and TXT values, that you'll need in order to add and verify the TXT records for your domain - in the next step.

|
Note:
|
To add a TXT record:
-
In the "Add TXT Records" dialog box [that was opened at the end of Step 1], click the Copy icon [
 ] to copy the "Primary TXT record" > "Name" to the clipboard.
 -
Go to your domain provider and add the TXT record name, using the value that you copied to the clipboard.
-
In the "Add TXT Records" dialog box [that was opened at the end of Step 1], click the Copy icon [
] to copy the "Primary TXT record" > "Value" to the clipboard. -
Go to your domain provider and add the TXT record value, using the value that you copied to the clipboard.
Note
Other AWS products may use this method of domain verification. This is OK, as it is acceptable to have more than one _amazonses.domain record, as long as the record values are different.
|
Note When you add a TXT record to your domain provider, it may take up to 72 hours for the domain provider to apply and replicate the change. If your domain verification status is still Pending after 72 hours - and can't be verified, see Troubleshooting domain verification. |
To verify a new TXT record:
-
Open "Acronis Email Security".
-
In the left navigation menu, select Settings > Protected Email Assets.
-
Locate the required domain. It should show "Pending" as the "Primary Status".
-
Open the domain to display details about the domain.
-
Locate "TXT record verification".
-
Click Verify on the right of "TXT record verification".
The status should change from Pending to Verified.
Note: If multi-region functionality is enabled, you'll need to verify TXT records for both the primary region and the secondary region. [see Multi-region]
-
In the Exchange admin center, click Mail flow > Rules.
[Click here: https://admin.exchange.microsoft.com/#/transportrules] -
Select the Perception Point Redirect Rule.
-
Click Edit rule conditions.
-
Under Apply this rule if, select:
"The recipient" > domain is. Add the domain or domains that you have just verified.

-
Click Save to save the modified rule.
Your new domain is now protected by "Acronis Email Security". 
Adding a domain to an existing Google Workspace integration
To add a new domain to an existing Google Workspace integration, perform the following 4 steps:
To add a domain to an existing Google Workspace integration:
-
In "Acronis Email Security", select Settings > Bundles and Channels.
-
Under Enabled Channels, locate Email Service, and then click Email service configuration [
] on the right. -
If the "Add and Configure Services" dialog box appears, click "Add a new email service".
The "Add a New Service" dialog box opens.
-
Make sure that Email Service > Google Workspace is selected.
-
-
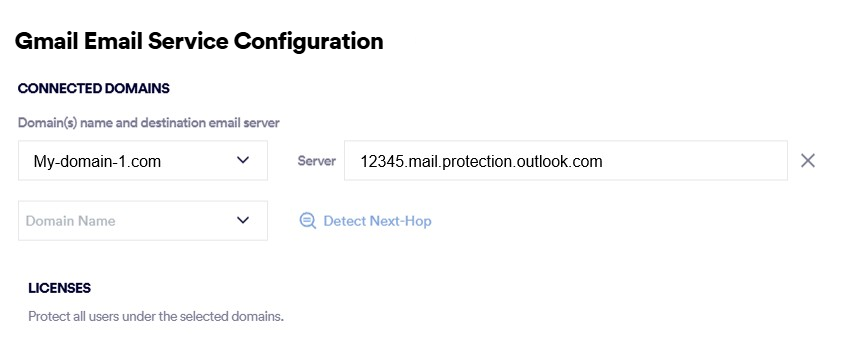
Click Next. The Gmail Email Service Configuration dialog box opens. The currently configured [protected] domains are shown.
-
-
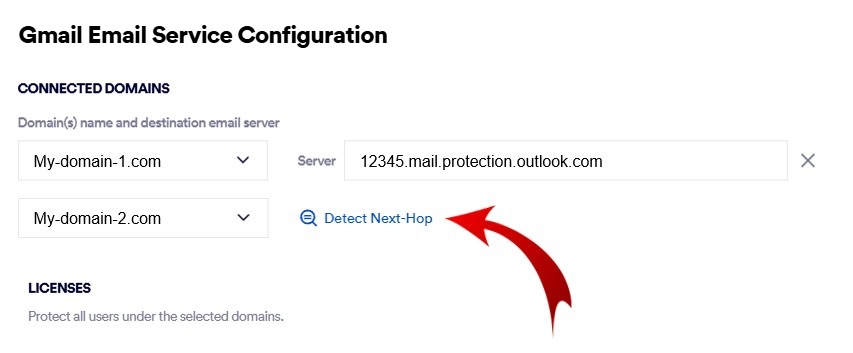
Under Connected Domains, on the right of Domain Name, click the down-arrow, and select the domain to add for protection.
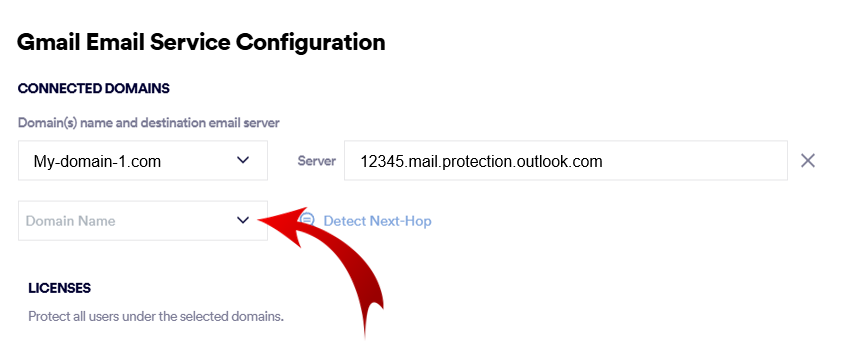
Note: The list of domains shows only the domains that were detected in the Google Workspace tenant that is associated with the current "Acronis Email Security" organization - and only those domains that are not already configured to be protected. To add domains that are not included in the current Google Workspace tenant, create a new organization in "Acronis Email Security", and then configure the required Google Workspace tenant and domains in that organization.
-
Click Detect Next-Hop to the right of the newly selected domain.
This should populate the Server field with a server address. This is the address to which mail will be sent after it has been scanned and marked as being clean.
The required Server value above is a server in your domain - as it appears in the MX record.
Important: Do not enter a value such as smtp.office365.com or outlook.office365.com or smtp.gmail.com.
Checking your SMTP server manually
You can perform the lookup procedure below to check that the SMTP server that appears is correct:
-
-
In Domain Name, enter your domain name - and then click MX Lookup.
Your required SMTP server will appear under Hostname.
-
-
-
[Optional] Click Add Domain - if you want to add more than 1 domain - and enter the required details.
- Licenses: "Acronis Email Security" will protect all email users in the domains that are now configured.
Note:
Partial domain protection is not supported with [commercial] Google Workspace integrations.
-
Click Next.
The "Add TXT Records" dialog box opens.
This dialog box includes the TXT names and TXT values, that you'll need in order to add and verify the TXT records for your domain - in the next step.
-
Now proceed with "Step 2: Adding a TXT record" below.
|
Note:
|
To add a TXT record:
-
In the "Add TXT Records" dialog box [that was opened at the end of Step 1], click the Copy icon [
] to copy the "Primary TXT record" > "Name" to the clipboard. -
Go to your domain provider and add the TXT record name, using the value that you copied to the clipboard.
-
In the "Add TXT Records" dialog box [that was opened at the end of Step 1], click the Copy icon [
] to copy the "Primary TXT record" > "Value" to the clipboard. -
Go to your domain provider and add the TXT record value, using the value that you copied to the clipboard.
Note
Other AWS products may use this method of domain verification. This is OK, as it is acceptable to have more than one _amazonses.domain record, as long as the record values are different.
Now proceed with "Step 3: Verifying the new TXT record" below.
|
Note When you add a TXT record to your domain provider, it may take up to 72 hours for the domain provider to apply and replicate the change. If your domain verification status is still Pending after 72 hours - and can't be verified, see Troubleshooting domain verification. |
To verify a new TXT record:
-
Open "Acronis Email Security".
-
In the left navigation menu, select Settings > Protected Email Assets.
-
Locate the required domain. It should show "Pending" as the "Primary Status".
-
Open the domain to display details about the domain.
-
Locate "TXT record verification".
-
Click Verify on the right of "TXT record verification".
The status should change from Pending to Verified.
Note: If multi-region functionality is enabled, you'll need to verify TXT records for both the primary region and the secondary region. [see Multi-region]
Now proceed with "Step 4: Updating the Redirect Rule" below.
-
Sign-in to the Google Admin console at admin.google.com.
-
Select Apps > Google Workspace > Gmail.
-
Scroll down to Compliance, and click it.
[or click here: https://admin.google.com/u/1/ac/apps/gmail/compliance]
-
Scroll down to Content Compliance.
-
Select the Perception Point Redirect Rule, and then click Edit.
-
In the Rules condition, scroll down and the click Show options.
-
Under C. Envelope filter > Only affect specific envelope recipients > Pattern match
Add the new domain, using a pipe symbol [|] to separate the domains [and without spaces between the domains], as follows:
Old_domain|New_domain
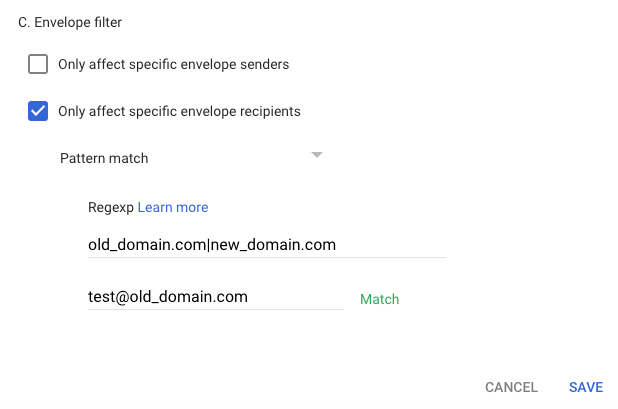
-
Click Save.
Your new domain in Google Workspace is now protected by "Acronis Email Security".
Adding a domain to an existing Microsoft 365 API integration
The actions that are required to add a domain to an existing Microsoft 365 API integration vary, depending on the protection method that is configured for the Microsoft 365 API integration:
-
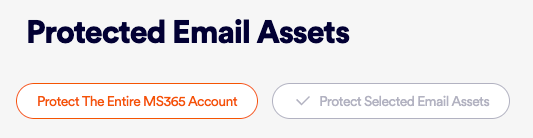
Protect the organization's entire Microsoft 365 account: Domains that are added to the organization's Microsoft 365 account - after the Microsoft 365 API integration was configured - will be automatically protected; it is not necessary to make any changes to the configuration in "Acronis Email Security".
-
Protect selected email assets: For details on how to add a domain to an integration that is currently configured to protect only specified domains, see Editing the protected assets.
To determine which protection option is configured in your organization, visit the Protected Email Assets page. For details, see Full protection vs Partial protection.
Adding a domain to an existing Exchange integration
To add a new domain to an existing Exchange integration, perform the following 4 steps:
-
In "Acronis Email Security", select Settings > Bundles and Channels.
-
Under Enabled Channels, locate Email Service, and then click Email service configuration [
] on the right. -
Click Add New Domain - if this option appears.
-
Select the Organization - if necessary.
-
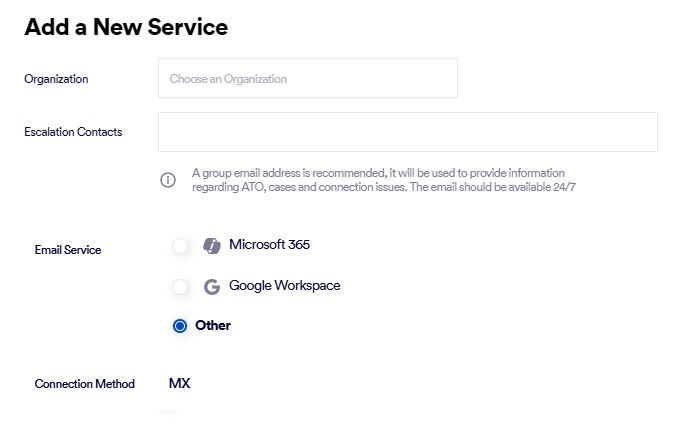
In Email Service, select Other.
-
Click Next.
The next step in the wizard appears, and lists all the domains that are currently configured for the organization.
-
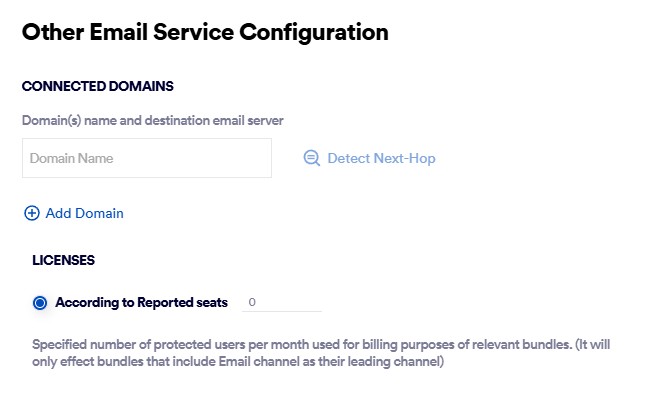
In the Domain Name box, enter the name of the new domain - for example, acme.com
-
Click Detect Next-Hop to the right of the domain name. This should populate the Server or Destination Mail Server field.
This is the address to which mail will be sent after it has been scanned and marked as being clean.
Important: Do not enter a value such as smtp.office365.com or outlook.office365.com
The required Destination Mail Server is a server in your domain - as it appears in the MX record.
Checking your Destination Mail server manually
You can perform the lookup procedure below to check that the Destination Mail Server that appears is correct:
-
-
In Domain Name, enter your domain name - and then click MX Lookup.
Your required SMTP server will appear under Hostname.
Error message: 
If you see the error message "This is not a valid SMTP host" - and the specified server is valid, then make sure that the required IPs are allow-listed in your firewall.
For details, see Adding domains above.
-
-
[Optional] Click Add Domain - if more than 1 domain is required - and enter the required details.
-
Licenses > Number of Licenses (seats): Specify the number of users that will be protected by "Acronis Email Security" on a monthly basis. This number will be used for billing purposes.
-
Click Next.
The "Add TXT Records" dialog box opens.
This dialog box includes the TXT record names and TXT record values, that you'll need in order to add and verify the TXT records for your domain - in Step 2.
If multi-region is enabled, there will be details for TXT records in both the primary and secondary regions. For details about the multi-region functionality, see Multi-region.
|
Note:
|
To add a TXT record:
-
In the "Add TXT Records" dialog box [that was opened at the end of Step 1], click the Copy icon [
] to copy the "Primary TXT record" > "Name" to the clipboard. -
Go to your domain provider and add the TXT record name, using the value that you copied to the clipboard.
-
In the "Add TXT Records" dialog box [that was opened at the end of Step 1], click the Copy icon [
] to copy the "Primary TXT record" > "Value" to the clipboard. -
Go to your domain provider and add the TXT record value, using the value that you copied to the clipboard.
Note
Other AWS products may use this method of domain verification. This is OK, as it is acceptable to have more than one _amazonses.domain record, as long as the record values are different.
|
Note When you add a TXT record to your domain provider, it may take up to 72 hours for the domain provider to apply and replicate the change. If your domain verification status is still Pending after 72 hours - and can't be verified, see Troubleshooting domain verification. |
To verify a new TXT record:
-
Open "Acronis Email Security".
-
In the left navigation menu, select Settings > Protected Email Assets.
-
Locate the required domain. It should show "Pending" as the "Primary Status".
-
Open the domain to display details about the domain.
-
Locate "TXT record verification".
-
Click Verify on the right of "TXT record verification".
The status should change from Pending to Verified.
Note: If multi-region functionality is enabled, you'll need to verify TXT records for both the primary region and the secondary region. [see Multi-region]
|
1 |
Recommendation: Changing MX records to "Acronis Email Security" Inbound relayWhen updating the MX records to route emails through the "Acronis Email Security" inbound relay, it is strongly recommended to follow the best practices that are shown below, to ensure optimal security and functionality:
|
||||||||||
|
2 |
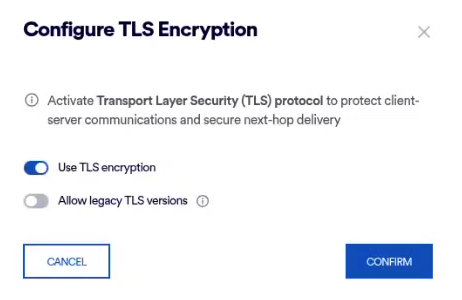
Before changing or adding the MX record as described below, check if the domain that you're adding supports TLS encryption. If not, in "Acronis Email Security", disable TLS encryption for the domain. [See below for instructions.]
When you edit the TLS configuration in "Acronis Email Security", you can enable or disable TLS encryption. By default, TLS encryption is enabled, and "Acronis Email Security" uses TLS version 1.2 - and not earlier versions. When TLS encryption is enabled, you can enable support for legacy versions as well [earlier than version 1.2]. |
||||||||||
|
3 |
|
||||||||||
|
4 |
In some cases, you may encounter an error similar to one of the following:
|
||||||||||
Note: When changing or adding the MX record, make sure that the MX record has the highest priority [0].
|
Setting the MX record with the highest priority [0] ensures that email traffic is directed to the specified mail server first. This is crucial for ensuring that your email service is properly routed and protected by "Acronis Email Security", as it allows the security measures to be applied to incoming emails. Having the highest priority makes sure that this server is the primary point of contact for email delivery, enhancing security and reliability. |

-
If you have a firewall, make sure that the "Acronis Email Security" IPs [shown below] are allow-listed in your firewall. The set of IPs varies depending on the environment in which your organization is located. [Open the drop-down below for details on how to determine your environment.]
What is the environment of your organization
-
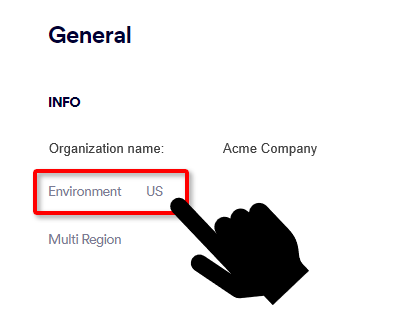
In "Acronis Email Security", go to Settings > Account.
-
The Environment of your organization will appear under General > Info: US, EU, or AUS.
For US environments
For EU environments
For AUS environments
-
3.81.182.154
-
3.93.155.149
-
3.95.118.12
-
3.95.142.181
-
54.227.64.76
-
189.25.64.0/24
-
52.12.169.124 [required only if Muti-region is enabled]
-
99.81.216.78
-
34.249.190.60
-
108.128.137.108
-
99.80.189.20
-
176.23.157.0/24
-
52.12.169.124 [required only if Muti-region is enabled]
-
13.236.255.231
-
54.66.125.250
-
176.23.158.0/24
-
52.12.169.124 [required only if Muti-region is enabled]
-
-
On your network provider, change the MX record as follows: [Open the drop-down below for details on how to determine your environment.]
What is the environment of your organization
-
In "Acronis Email Security", go to Settings > Account.
-
The Environment of your organization will appear under General > Info: US, EU, or AUS.
Multi-region enabled Multi-region not enabled For US environments
us.mx-pp.com
inbound-smtp.us-east-1.amazonaws.com
For EU environments
eu.mx-pp.com
inbound-smtp.eu-west-1.amazonaws.com
For AUS environments
australia.mx-pp.com
inbound-smtp.ap-southeast-2.amazonaws.com
-
Your new domain is now protected by "Acronis Email Security".
Adding a domain to an existing "Other" integration
To add a new domain to an existing "Other" integration, perform the following 4 steps:
-
In "Acronis Email Security", select Settings > Bundles and Channels.
-
Under Enabled Channels, locate Email Service, and then click Email service configuration [
] on the right. -
Click Add New Domain - if this option appears.
-
Select the Organization - if necessary.
-
In Email Service, select Other.
-
Click Next.
The next step in the wizard appears, and lists all the domains that are currently configured for the organization.
-
In the Domain Name box, enter the name of the new domain - for example, acme.com
-
Click Detect Next-Hop to the right of the domain name. This should populate the Server or Destination Mail Server field.
This is the address to which mail will be sent after it has been scanned and marked as being clean.
Important: Do not enter a value such as smtp.office365.com or outlook.office365.com
The required Destination Mail Server is a server in your domain - as it appears in the MX record.
Checking your Destination Mail server manually
You can perform the lookup procedure below to check that the Destination Mail Server that appears is correct:
-
-
In Domain Name, enter your domain name - and then click MX Lookup.
Your required SMTP server will appear under Hostname.
Error message:
If you see the error message "This is not a valid SMTP host" - and the specified server is valid, then make sure that the required IPs are allow-listed in your firewall.
For details, see Adding domains above.
-
-
[Optional] Click Add Domain - if more than 1 domain is required - and enter the required details.
-
Licenses > Number of Licenses (seats): Specify the number of users that will be protected by "Acronis Email Security" on a monthly basis. This number will be used for billing purposes.
-
Click Next.
The "Add TXT Records" dialog box opens.
This dialog box includes the TXT record names and TXT record values, that you'll need in order to add and verify the TXT records for your domain - in Step 2.
If multi-region is enabled, there will be details for TXT records in both the primary and secondary regions. For details about the multi-region functionality, see Multi-region.
|
Note:
|
To add a TXT record:
-
In the "Add TXT Records" dialog box [that was opened at the end of Step 1], click the Copy icon [
] to copy the "Primary TXT record" > "Name" to the clipboard. -
Go to your domain provider and add the TXT record name, using the value that you copied to the clipboard.
-
In the "Add TXT Records" dialog box [that was opened at the end of Step 1], click the Copy icon [
] to copy the "Primary TXT record" > "Value" to the clipboard. -
Go to your domain provider and add the TXT record value, using the value that you copied to the clipboard.
Note
Other AWS products may use this method of domain verification. This is OK, as it is acceptable to have more than one _amazonses.domain record, as long as the record values are different.
|
Note When you add a TXT record to your domain provider, it may take up to 72 hours for the domain provider to apply and replicate the change. If your domain verification status is still Pending after 72 hours - and can't be verified, see Troubleshooting domain verification. |
To verify a new TXT record:
-
Open "Acronis Email Security".
-
In the left navigation menu, select Settings > Protected Email Assets.
-
Locate the required domain. It should show "Pending" as the "Primary Status".
-
Open the domain to display details about the domain.
-
Locate "TXT record verification".
-
Click Verify on the right of "TXT record verification".
The status should change from Pending to Verified.
Note: If multi-region functionality is enabled, you'll need to verify TXT records for both the primary region and the secondary region. [see Multi-region]
|
1 |
Recommendation: Changing MX records to "Acronis Email Security" Inbound relayWhen updating the MX records to route emails through the "Acronis Email Security" inbound relay, it is strongly recommended to follow the best practices that are shown below, to ensure optimal security and functionality:
|
||||||||||
|
2 |
Before changing or adding the MX record as described below, check if the domain that you're adding supports TLS encryption. If not, in "Acronis Email Security", disable TLS encryption for the domain. [See below for instructions.]
When you edit the TLS configuration in "Acronis Email Security", you can enable or disable TLS encryption. By default, TLS encryption is enabled, and "Acronis Email Security" uses TLS version 1.2 - and not earlier versions. When TLS encryption is enabled, you can enable support for legacy versions as well [earlier than version 1.2]. |
||||||||||
|
3 |
|
||||||||||
|
4 |
In some cases, you may encounter an error similar to one of the following:
|
||||||||||
Note: When changing or adding the MX record, make sure that the MX record has the highest priority [0].
|
Setting the MX record with the highest priority [0] ensures that email traffic is directed to the specified mail server first. This is crucial for ensuring that your email service is properly routed and protected by "Acronis Email Security", as it allows the security measures to be applied to incoming emails. Having the highest priority makes sure that this server is the primary point of contact for email delivery, enhancing security and reliability. |
-
If you have a firewall, make sure that the "Acronis Email Security" IPs [shown below] are allow-listed in your firewall. The set of IPs varies depending on the environment in which your organization is located. [Open the drop-down below for details on how to determine your environment.]
What is the environment of your organization
-
In "Acronis Email Security", go to Settings > Account.
-
The Environment of your organization will appear under General > Info: US, EU, or AUS.
For US environments
For EU environments
For AUS environments
-
3.81.182.154
-
3.93.155.149
-
3.95.118.12
-
3.95.142.181
-
54.227.64.76
-
189.25.64.0/24
-
52.12.169.124 [required only if Muti-region is enabled]
-
99.81.216.78
-
34.249.190.60
-
108.128.137.108
-
99.80.189.20
-
176.23.157.0/24
-
52.12.169.124 [required only if Muti-region is enabled]
-
13.236.255.231
-
54.66.125.250
-
176.23.158.0/24
-
52.12.169.124 [required only if Muti-region is enabled]
-
-
On your network provider, change the MX record as follows: [Open the drop-down below for details on how to determine your environment.]
What is the environment of your organization
-
In "Acronis Email Security", go to Settings > Account.
-
The Environment of your organization will appear under General > Info: US, EU, or AUS.
Multi-region enabled Multi-region not enabled For US environments
us.mx-pp.com
inbound-smtp.us-east-1.amazonaws.com
For EU environments
eu.mx-pp.com
inbound-smtp.eu-west-1.amazonaws.com
For AUS environments
australia.mx-pp.com
inbound-smtp.ap-southeast-2.amazonaws.com
-
Your new domain is now protected by "Acronis Email Security".
See also:
