This section includes:
About Scans
The Scans page lets you see information about the scans that were performed by Perception Point X‑Ray.
-
If you select a parent organization, then the Scans page will show all scans that were performed in all child organizations.
-
If you select a child organization, then the Scans page will show the scans that were performed in the selected child organization only.
In addition, you can set various filters to include only specific scans in the displayed list.
To show the Scans page:
-
In Perception Point X‑Ray, in the left navigation menu, select Security Operations > Scans.
|
Any admin user with the "Member" role [or higher] can access the Scans page. |
Views of the Scans page
The Scans page can show three levels of detail for each scan:
|
Summary |
By default, the Scans page shows a list of scans, and a summary of each scan. Use the available controls to filter the list of scans shown, as described in Setting the scan filter below. |
Scans-summary page |
|
Preview or Expanded |
You can click any scan in the summary list to expand the results to show additional details about the scan. This view lets you perform a quick incident review. |
Scans-preview page |
|
Detailed |
You can click the Open Scan button [ |
Scans-details page |
Setting the scan filter
There are various ways that you can search and filter the scans that appear in the Scans-summary page. For details, see Filtering scans.
Understanding the scan controls [Summary page]
Select one or more scans to display the available controls.
|
Download scans |
|
Downloads metadata about the selected scan or the selected scans to your computer - in CSV format. You must select one or more scans before you can download them.
|
||||||||
|
Export scans |
|
Exports metadata about the selected scan or the selected scans - in CSV format. You must select one or more scans before you can export them. The exported data will be contained in a file that is sent as an attachment to an email that is sent to your email address.
|
||||||||
|
Change verdict |
|
Lets you change the verdict of the selected scan or of the selected scans.
|
||||||||
|
Resend Email |
|
Resends the selected email or the selected emails. Resending emails is typically performed on emails with failed deliveries.
To list scans for emails with failed deliveries, you can use an Advanced filter:
|
||||||||
|
Release email |
|
Releases the selected email or emails from quarantine. The verdict of the email is not changed - if the verdict is Malicious, then the verdict will remain as Malicious.
The Release email button is enabled only if all selected scans are for emails that are quarantined.
|
||||||||
|
Delete Email |
|
Deletes the selected email or the selected emails from the recipient's mailbox - without changing the scan verdict. Details about the scans are not deleted from Perception Point X‑Ray. [You can't delete a scan from Perception Point X‑Ray.]
|
||||||||
|
Filter by |
|
Lets you customize the display filter. |
||||||||
|
Open scan |
or
|
Opens the Scans-details page to show comprehensive details of the scan. |


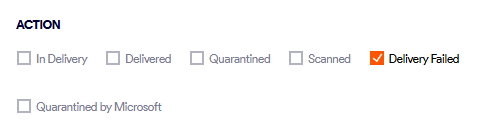
 Hint: Use the Action > Quarantined advanced filter to ensure that only quarantined emails are displayed. For details, see
Understanding the scan controls [Details page]
When you open a scan to display details of the scan, the following controls are available:
|
Change verdict |
|
Lets you change the verdict of the scan.
|
|||
|
Preview |
|
Shows a preview of the email.
While you preview an email, you can click Download [
|
|||
|
Screenshots |
|
Shows screenshots of the malicious URLs that are included in the email. |
|||
|
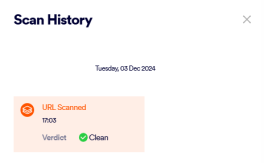
Scan History |
|
Opens the Scan History pane that shows the history of all the changes that have been made to the scan verdict.
|
|||
|
Delete Email |
|
Deletes the email from the recipient's mailbox - without changing the scan verdict. Details about the scan are not deleted from Perception Point X‑Ray. [You can't delete a scan from Perception Point X‑Ray.]
|
|||
|
Similar scans |
|
Lists similar scans. |
|||
|
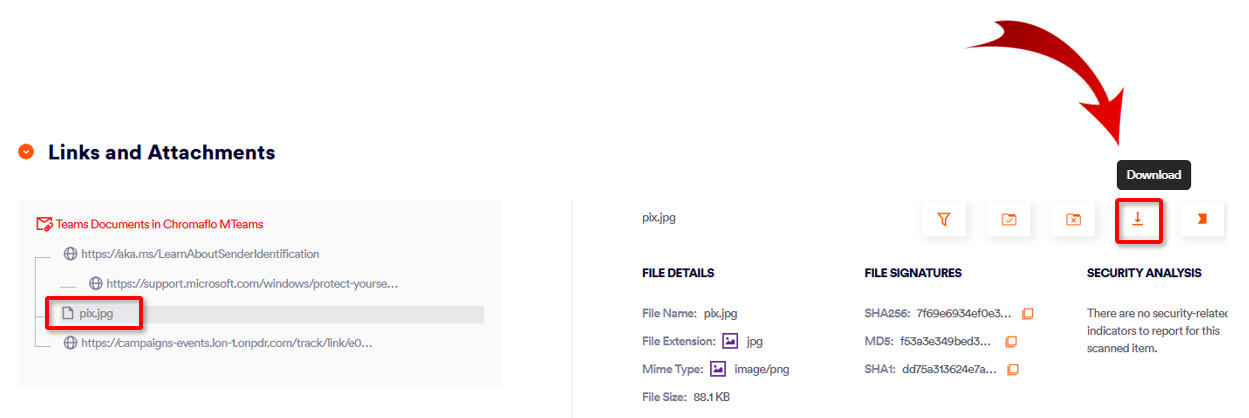
|
Downloads the email or file to your Downloads folder. This may be useful if you want to do further analysis of the email or file. The email or file will be downloaded with a .danger extension appended to it. You can remove the .danger extension - to be left with a .eml file [for emails] that you'll be able to open.
You can download an attachment to an email. To do so:
|
||||
|
Resend Email |
|
Resends the email. Resending emails is typically performed on emails with failed deliveries.
To list scans for emails with failed deliveries, you can use an Advanced filter:
|
|||
|
Add to Allowlist |
|
Allows you to add the sender's email address to an allowlist. For details, see Allowlists. |
|||
|
Add to Block list |
|
Allows you to add the sender's email address to a block list. For details, see Blocklists. |
|||
|
|
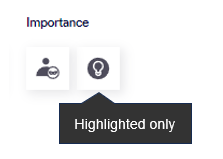
Lets you add the Highlighted tag to the scan. You can added the Highlighted tag to scans with malicious verdicts only. This enables you to filter [show] only those scans that have been highlighted. The Highlighted filter control [
You can add the Highlighted tag to a scan only when you display the details of the scan in the Scans-details page. In the Scans-summary view, the Highlighted icon [light-bulb] appears on the left of the scan entry.
There are three ways that a Highlighted tag can be added:
|
||||
|
Request Investigation |
|
Sends a request to the Perception Point IR Team to investigate the scan. For details, see Requesting an investigation. |
|||
|
Release email |
|
Releases the email from quarantine. The verdict of the email is not changed - if the verdict is Malicious, then the verdict will remain as Malicious.
The Release email button is enabled only if all selected scans are for emails that are quarantined.
|


 ]
]

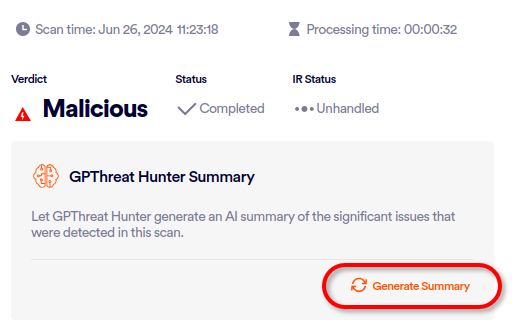
GPThreat Hunter Summary
When you analyze a malicious scan in the Scans page, you can generate an "easy-to-read" AI-based summary of the significant factors that contributed to the scan verdict. Locate "GPThreat Hunter Summary" in the Scans page, and then click Generate Summary. GPThreat Hunter will almost-instantaneously generate an easy-to-read summary of the scan verdict.
|
Note: This functionality is available only for email scans that have a malicious verdict. |
Performing bulk actions
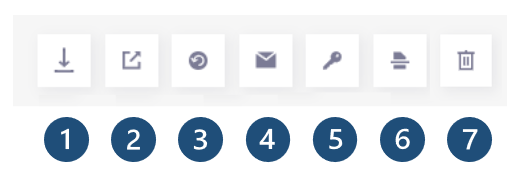
In the Scans-summary page, it is possible to perform some of the available actions simultaneously on multiple scans. These actions are called bulk actions. The controls for the bulk functions are all grouped together - and appear when at least one scan is selected. The bulk actions that can be performed are shown below:
|
|
Control |
Limitations... |
|---|---|---|
|
1 |
Download scans |
|
|
2 |
Export scans |
|
|
3 |
Change verdicts |
|
|
4 |
Resend emails |
|
|
5 |
Release emails |
|
|
6 |
Rescan |
This option may not be available. |
|
7 |
Delete emails |
|
|
Note: Some bulk-action options may not be available if any of the selected scans are for emails that are:
|
For details on the bulk actions, see Understanding the scan controls [Summary page] above.
To perform a bulk action:
-
Open the Scans-summary page.
-
Filter the scans that are shown. The Advanced Filter may be helpful. For details, see Advanced filters.
-
Select the required scans.
-
Click the appropriate bulk-action button to perform the required action.
Getting the URL of the scan
When you are performing troubleshooting actions with Perception Point Support, they may ask you to send the scan URL.
To get the scan URL:
-
In Perception Point X‑Ray, open the Security Operations > Scans page.
-
Locate scans for which the scan URL is required.
-
Click the Open Scan button [
 or
or  ] on the right of the scan results - to show details of the scan.
The URL that appears in the browser is the scan URL.
Exporting the scan list
You can export [or download] the list of scans that are displayed in the Scans page. The exported list will be in a .csv file, and will include metadata about the emails.
|
Note: In the downloaded CSV files, all dates and times are in UTC format. This can't be changed. Times may therefore differ from the times that appear in the UI of the Scans page in Perception Point X‑Ray. |
To export the scans list:
-
In Perception Point X‑Ray, open the Security Operations > Scans page.
-
Use the available filter controls to display a list of the required scans. For filtering details, see Filtering scans.
-
Select the Select all scans check box in the top-left of the scans list.

-
Click either the Export button or the Download "bulk action" button. For details, see Performing bulk actions above.

See also:
