This section includes:
About filtering scans
The Scans page lets you see information about all the scans that were performed by Perception Point X‑Ray in your organization. You can set various filters to include only specific scans in the list of displayed scans. The available filters include:
You can combine any of the above filters.
Quick filters
These filters provide a quick way to filter the scan-list by date, verdict, or channel. You can also use the Importance filters to filter based on VIP status and highlight status of the scans.
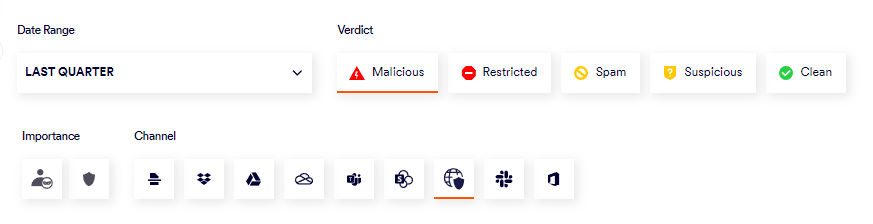
The Quick Filter controls are located at the top of the Scans page.
|
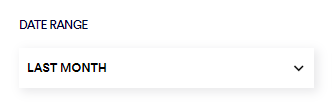
Date Range |
Specify the date range to display in the Scans-summary page. |
|
|
Verdict |
Specify the scan verdicts to include in the Scans-summary page. See Verdicts for details. |
|
|
Importance |
Use the available controls to specify the importance-types to include in the Scans-summary page.
|
|
|
Channel |
Specify the channels to include in the Scans-summary page.
For details, see Bundles and Channels. |

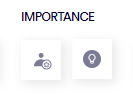
 ] VIP only: Includes only those emails that were sent to VIP users. For details on VIP users, see
  ] Highlighted only: Includes only incidents that have been tagged as Highlighted. See
Text filters
The text filter control allows searching the scan metadata for a specified text string - looking inside various fields such as sender address, subject, and file hash.
The text filter control is located towards the top-right of the Scans page.

You can include the following in your text filters:
-
An asterisk [*] - wildcard character - will match zero or more characters. You can include a maximum of 2 asterisks in each search string.
-
A string inside double quotes ["] to search for a specific string. For example, "urgent attention required" will search for the exact string "urgent attention required".
Advanced filters
The Advanced Filters [or Advanced Search] control is located towards the top of the Security Operations > Scans page - on the right of the text filter control.
![]()
To access the "Advanced Filters", click the "Advanced Filters" icon [![]() ] - that is located on the right of the text filter control. This will display the properties available for filtering. Scroll down to display additional filter properties.
] - that is located on the right of the text filter control. This will display the properties available for filtering. Scroll down to display additional filter properties.
-
The advanced filters do not support asterisks [*] - wildcard characters.
-
You can select multiple filter properties. For example, you could show only those emails that are:
-
from a specified sender email address, and
-
that were quarantined
-
-
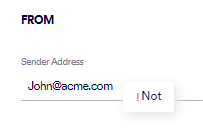
For any of the text-based properties, you can specify exclusion values. For example, you could display only those emails that have the word "urgent" in the Subject, or alternatively, you could display only those emails that DON'T have the word "urgent" in the Subject. [Add an exclamation mark [!] before the text to indicate exclusion or NOT.]
Excluding scans
Note: To use the Advanced filter to exclude scans from being displayed, enter the value to exclude, and then click on the "!Not" option that appears. For example, to exclude scans for all emails that were sent from John@acme.com, add an exclamation mark [!] before John@acme.com or click on the "!Not"
-
After you have specified all the required advanced filters, click "Apply Filters" to apply the filters.
|
Note: To save a specific filter, copy and then save the URL that appears in your browser after you have configured and applied the filter. |
To list scans that have a specific hash value, it is recommended that you use an Advanced filter.
-
In the Scans page, make sure to set the correct Date Range.
-
Open the Advanced filters feature - by clicking the "Advanced Filters" icon [
 ].
]. -
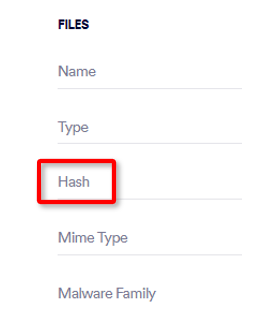
Scroll down the list of filter options, and then under Files select Hash.

-
Paste the required hash - without any quotation marks.
-
Click "Apply Filters" to display the list of scans.
Top X component filters
The "Top-X component" includes various filters, such as organization, layer, and engine. For each of the "Top-X component" filters, there is a list of the most common entries. For example, the Sender Address filter shows the sender addresses that appear most frequently in the listed scans.
The Top-X component appears just below the Quick Filter bar in the Scans-summary page.
|
Note:
|
Configuring the available Top-X components
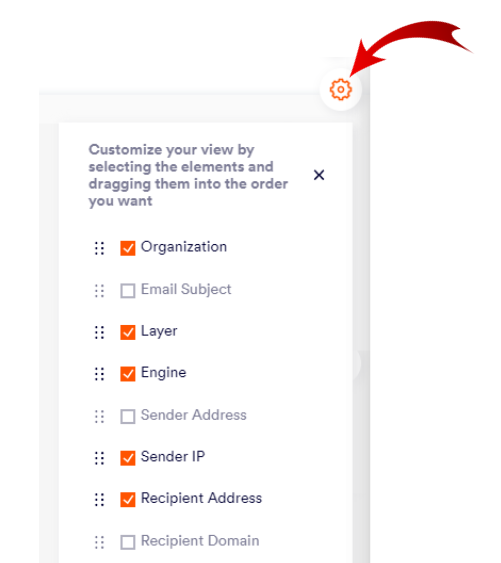
You can configure the specific options that appear in the Top-X component, and the order of the options inside the component.
To configure Top-X component:
-
Click the Settings icon [
 ] on the right of the Top-X component.
-
Select the options that you want to appear.
-
Drag the selected options into the order in which you want them to appear.
|
Note: You can click Reset to select all the options, and reset them to their original order. |
See also:
