Onboarding Microsoft 365 [API]
This page includes:
About onboarding Microsoft 365 using the Microsoft API
You can connect your Microsoft 365-based email services to Perception Point X‑Ray – using the Microsoft Graph API. This is called the Microsoft API connection method.
This page describes how to integrate Perception Point X‑Ray with Microsoft 365 using the Microsoft API connection method. For details on how to integrate Perception Point X‑Ray with Microsoft 365 using the inline connection method, see Step 1 - Onboarding Microsoft 365 [Inline].
-
For a comparison between the Microsoft API and Inline connection methods, see Comparing the Inline and API connection methods.
|
Note: With Microsoft 365 API integrations, Perception Point X‑Ray scans email messages up to a maximum size of 500 MB [including attachments]. |
By default, the Microsoft 365 integrations monitor incoming emails only - not outgoing emails.
-
Outbound monitoring can be configured for Microsoft 365 - see Onboarding Microsoft 365 - Outbound
-
By default, internal email is not monitored. There may be additional licensing requirements for enabling internal scanning. To add monitoring for internal email, contact Perception Point Support [support@perception-point.io].
|
Note:
|
A bit more about the Microsoft 365 API integration
Onboarding process
-
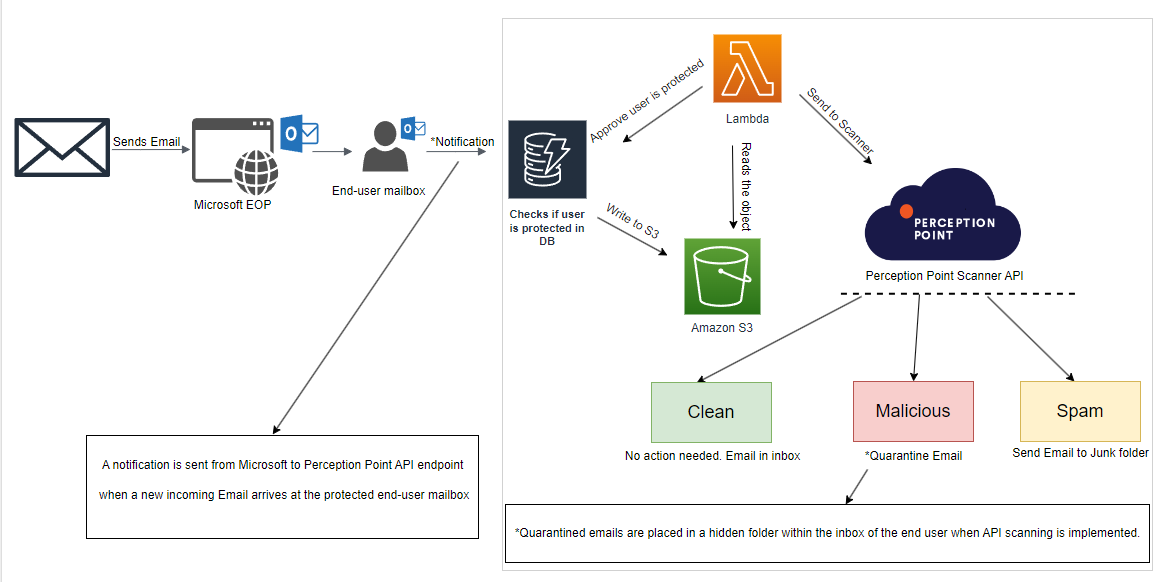
API scanning initiates by creating a Webhook for each user within the Microsoft 365 environment.
Protection mechanism
-
When a user is protected by Perception Point X‑Ray Microsoft 365 API integration, the scan activates upon the arrival of an inbound email.
-
Microsoft 365 triggers a notification to the scanning system about a new email in the user's Inbox.
-
The system retrieves the email's metadata and EML file copy for analysis.
Scan and response
-
Clean: If an email is assigned a clean verdict, the email remains in the user's Inbox - without any intervention.
-
Spam: By default, spam emails are moved to the Junk Email folder via Microsoft Graph API's REST API calls.
-
Malicious: By default, malicious inbound emails are moved to a hidden [not visible] folder [called pp-quarantine] inside the user's mailbox. The hidden folder is created the first time that a scan is assigned a malicious verdict for that user. [Note that the hidden folder may be revealed when you search for an email inside Outlook.]
When an email is moved to the quarantine folder, the subject of the quarantined email is changed to "Quarantined Email" and the content [body] of the quarantined email is changed to "This Email has been quarantined." If the quarantined email is subsequently found to be clean or spam [junk], the original subject and contents are restored to the email when it is released.
How to onboard Microsoft 365 using the Microsoft API
This onboarding procedure for a Microsoft 365 API integration includes:
-
Specifying the connection method.
-
Enabling the Perception Point app - that enables the required access to your Microsoft 365 account.
-
Specifying who to protect [the plan].
-
Initiating the connection process.
To onboard Microsoft 365 using the Microsoft API:
-
Select Account > Bundles and Channels.
-
Under Enabled Channels, locate Email Service, and then click Email service configuration [
 ] on the right.
Note: Depending on your version of Perception Point X‑Ray, you may need to click on the Add Services icon [
 ] on the right side of the Perception Point X‑Ray banner.
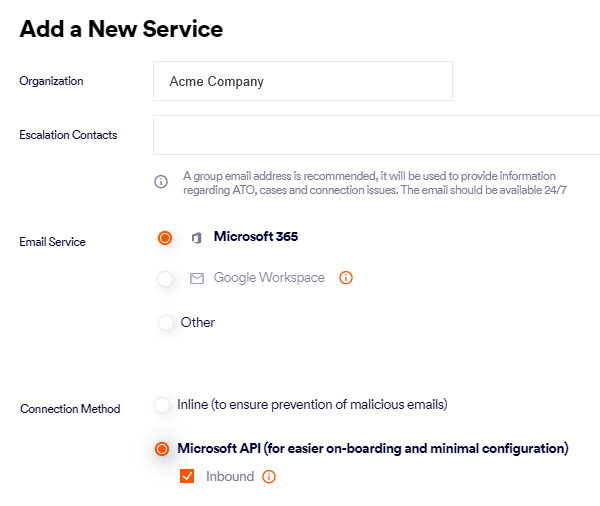
-
Click Add A New Email Service - if this option appears.
-
Select the Organization - if necessary.
-
Specify the Escalation contacts. For details, see Escalation contacts.
-
In Email Service, select Microsoft 365.
-
In Connection Method, select Microsoft API.
-
Inbound: Will be automatically selected. This configures Perception Point X‑Ray to scan emails that are received from outside the organization.
-
Outbound: [Optional] This configures Perception Point X‑Ray to scan emails that are sent from inside the organization. This option appears only if outbound scanning is enabled. For details, see Onboarding Microsoft 365 - Outbound.
Note: By default, internal email is not monitored. To add monitoring for internal email, contact Perception Point Support [support@perception-point.io]. There may be additional licensing requirements for enabling internal scanning.
-
-
Click ENABLE M365 APP - in the bottom right corner. [This is the remediation app.]
Important: If the ENABLE M365 APP button is not enabled, make sure that you have specified an escalation contact above.
-
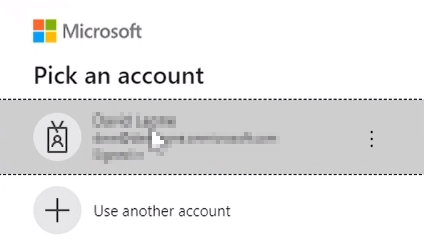
A pop-up window will open - allowing you to sign-in to your Microsoft account.
Note: If the pop-up does not appear, make sure that pop-ups are not blocked on your computer.
-
Sign-in to your Microsoft account as a global admin.
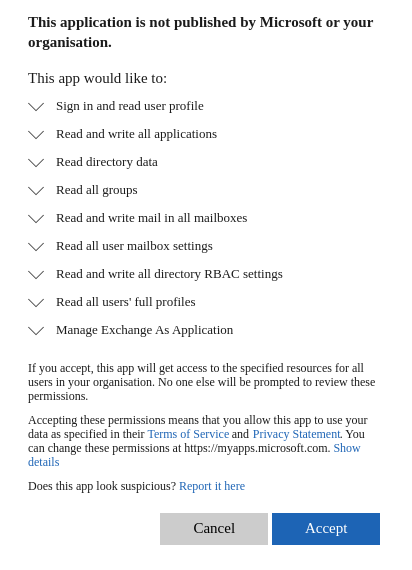
You'll see a list of the permissions that are required by the Perception Point X‑Ray app.
-
Click Accept.
The next step in the onboarding wizard appears.
-
-
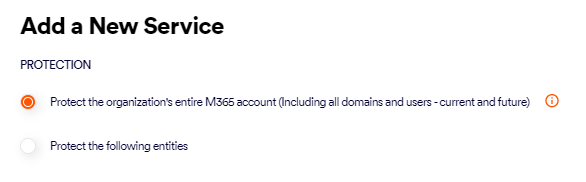
Specifying who to protect [Microsoft 365 - API]
[This is also known as the plan.]
-
Protect the organization's entire Microsoft 365 account: Protects all email addresses in all the domains that are included in your organization's Microsoft 365 account.
Note: Domains and email addresses that are added in the future to the organization's Microsoft 365 account will be automatically protected - it is not necessary to make any changes in Perception Point X‑Ray.
-
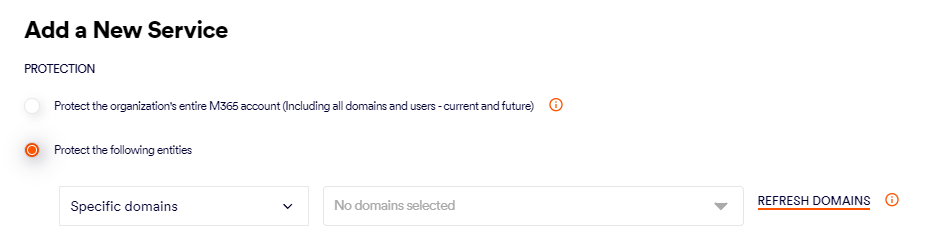
Protect the following entities only: Allows you to specify which domains, groups, and users [email addresses] to protect.
Note:
-
After onboarding a Microsoft 365 - API integration, you can change the set of assets that are protected by Perception Point X‑Ray. Changing the set of assets includes:
-
deleting any of the specified domains, groups, or users
-
specifying additional domains, groups, or users
For details, see Editing the protected assets.
-
-
You can specify a maximum of 300 assets [domains, groups, and users] to protect.
-
Specific domains: Protects only the domains that you specify. All users inside the specified domains will be protected.
Note:
-
Email addresses that are added [in Microsoft 365] in the future to any of the specified domains will also be protected.
-
Domains that are added to the organization's Microsoft 365 account won't be automatically protected. For details, see Adding a domain to an existing integration.
[It may take up to 24 hours for the new entity to be added to Perception Point X‑Ray.]
-
-
Specific groups and users: Protects only the groups and users that you specify.
Note:
-
Groups can be any of the following group types: Microsoft 365; Distribution; Mail-enabled security
Dynamic distribution lists are not supported.
-
Where required, specify the group email ID.
-
Email addresses that you specify must be included in your Microsoft 365 account.
-
Email addresses that are added in the future [in Microsoft 365] to any of the specified groups will also be protected.
[It may take up to 24 hours for the new entity to be added to Perception Point X‑Ray.]
-
-
Specific domains, groups and users: Protects all the domains, groups, and users that you specify.
Note:
-
Groups can be any of the following group types: Microsoft 365; Distribution; Mail-enabled security
Dynamic distribution lists are not supported.
-
Where required, specify the group email ID.
-
Email addresses that you specify must be included in your Microsoft 365 account.
-
Email addresses that are added in the future [in Microsoft 365] to any of the specified groups will also be protected.
[It may take up to 24 hours for the new entity to be added to Perception Point X‑Ray.]
Note about future changes:
-
Domains that are added to your Microsoft 365 account in the future will not be protected.
-
Email addresses that are added in the future [in Microsoft 365] to any of the specified domains or groups will also be protected.
[It may take up to 24 hours for the new entity to be added to Perception Point X‑Ray.]
-
Email addresses that are added to your Microsoft 365 account [outside of the specified domains and groups] in the future will not be protected.
-
-
-
-
[This step may not appear] Select to where spam emails will be moved - to the user's Inbox or the Junk folder - if spam emails are not configured to be quarantined.
-
Inbox: The email is sent to the user's Inbox. This setting is typically used for PoC installations - not for production installations.
-
Junk: The email is sent to the user's Junk folder. This setting is typically used in production installations - not in PoC installations.
This setting can be changed after on-boarding. For details, see Configuring spam remediation below.
-
-
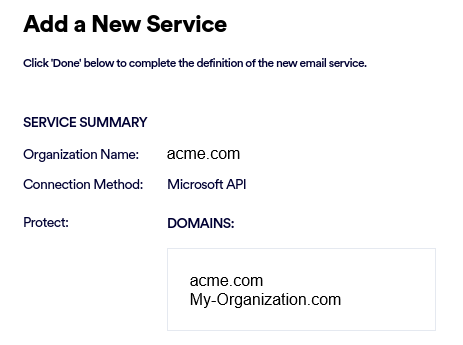
Click Next. A summary of your selected configurations will be displayed.
-
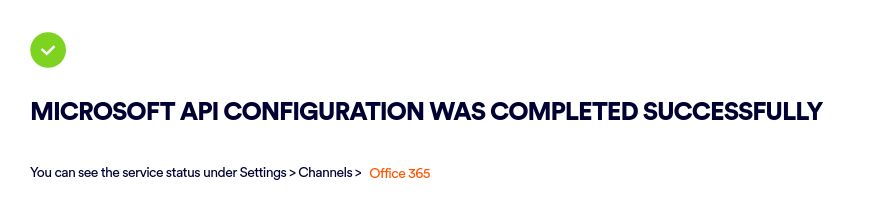
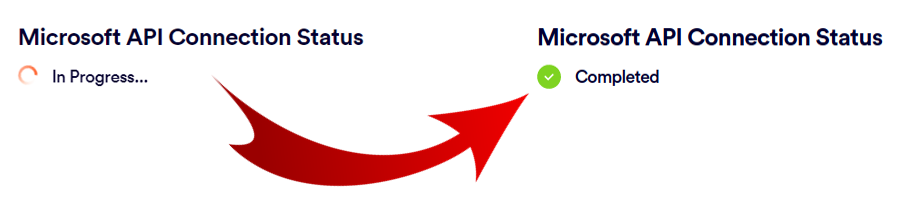
Review the configurations, and then click Done. This will begin the connection process to protect the users that you specified above. This connection process may take a while to complete.
-
Click the
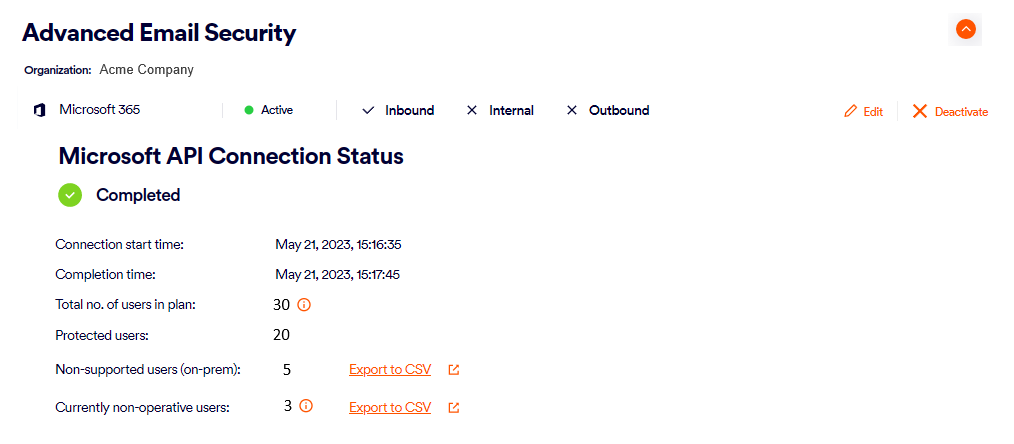
Connection start time:
The time that the connection process was started.
Completion time
The time that the connection process was completed.
Total no. of users in plan
The number of users included in the plan. This is the maximum number of users that will be protected when the connection process is complete. This excludes invalid users in the plan.
Protected users
The number of users that are already protected by Perception Point X‑Ray.
Non-supported users (on-prem)
The number of Microsoft Exchange users that are included in the plan that you specified. These users will not be protected by Perception Point X‑Ray. You can export a .csv file that contains a list of these users.
This value is applicable in "Microsoft 365 - Exchange" hybrid environments.
Currently non-operative users
The number of users that are included in the plan that you specified, but for whom Perception Point X‑Ray was not able to add protection during the connection process. You can export a .csv file that contains a list of these users.
This information will be displayed for 30 days after the connection process is completed.
When the In Progress indicator changes to Completed, the users included in the plan will be protected.
-
If you want to configure this Microsoft 365 integration to operate in monitoring mode, continue with Configuring monitoring mode below.
Configuring monitoring mode
|
Important: Perform this procedure only if you want your Microsoft 365 API integration to operate in monitoring mode. Monitoring mode is typically used for PoC implementations. In monitoring mode [also known as passive, silent, or detection mode], Perception Point X‑Ray will not:
|
To configure the API integration to operate in monitoring mode:
-
Open the Account > Bundles and Channels page.
-
On the right, click Default Channel Settings.
-
Click Edit [
 ].
]. -
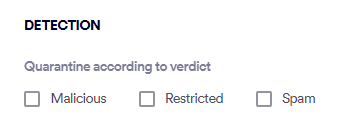
Under Detection, clear the Malicious, Restricted, and Spam check boxes.
-
Click Save.
-
Open the Account > Bundles and Channels page.
-
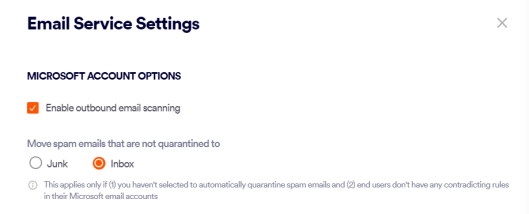
Under Enabled Channels, on the right of Email Service > Microsoft 365, click Channel Settings. The "Email Service Settings" sidebar opens.
-
Click Edit [
]. -
Under Microsoft Account Options > "Move spam emails that are not quarantined to", select Inbox.
-
Click Save.
Your Microsoft 365 API Integration is now configured to operate in monitoring mode.
Perception Point X‑Ray will not quarantine any malicious emails or route spam to Junk folders.
Adding protected Assets [domains, groups, and users]
After you have configured a Microsoft 365 API integration, you can add domains, groups, and users to the list of assets that are protected.
|
Note: You can add domains, groups, and users only if your are protecting just a specified set of assets [partial protection] - and not the entire Microsoft 365 account. For details, see Full protection vs Partial protection. |
To add domains, groups, and users to the list of assets that are protected:
-
In Perception Point X‑Ray, go to Account > Protected Email Assets.
-
Click "Configure Email Protection" in the top-right corner. This will open the configuration wizard.
-
In the wizard, use the available controls to add the required domains, groups, and users.
-
Click Next to continue with the required configuration changes.
|
Note: You can also click "Add Domains", "Add Groups", or "Add Users" on the right of the relevant section. A pane will open on the right - enabling you to add the required assets. |
Configuring protected assets [domains, groups, and users]
After you have configured a Microsoft 365 API integration, you can configure [edit] the protected assets, as shown below.
|
Note: You can configure protected assets only if your are protecting just a specified set of assets [partial protection] - and not the entire Microsoft 365 account. For details, see Full protection vs Partial protection. |
|
To add a domain, group, or user:
|
|
You can use the functionality on the Protected Email Assets page to enable, disable, or delete any of the protected assets [domains, groups, and users]. The required controls are found on the right of each protected asset. |
Configuring spam remediation
Configuring a Microsoft 365 API integration includes specifying what happens to emails that are assigned a spam verdict [if spam emails are not configured to be quarantined]. The options are:
- Inbox: The email is sent to the user's Inbox. This setting is typically used for PoC installations - not for production installations.
-
Junk: The email is sent to the user's Junk folder. This setting is typically used in production installations - not in PoC installations.
With the Microsoft 365 API integration, Perception Point X‑Ray may move an email from the Inbox to the Junk folder after the email has initially arrived in the Inbox. The procedure is therefore referred to as "spam remediation".
When a Microsoft 365 API inbound integration is initially configured, the spam remediation is set to Junk.
|
Note: The "spam remediation" functionality will apply only if:
|
The spam remediation controls appear only if a Microsoft 365 API inbound integration is configured. The controls don't appear if a Microsoft 365 Inline integration is configured.
To change the spam remediation location:
-
Open the Account > Bundles and Channels page.
-
Under Enabled Channels, on the right of Email Service > Microsoft 365, click Channel Settings. The "Email Service Settings" sidebar opens.
-
Click Edit [
]. -
Under Microsoft Account Options > "Move spam emails that are not quarantined to", select Junk or Inbox.
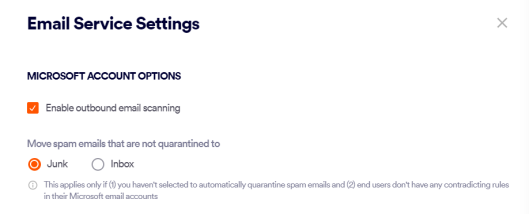
-
Click Save.
See also:
