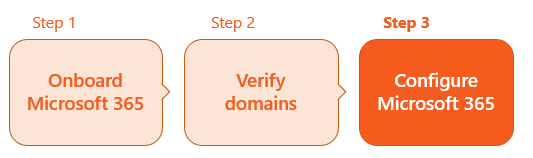
Step 3 - Configuring Microsoft 365 [Inline]
You can integrate "Acronis Email Security" with Microsoft 365. This enables "Acronis Email Security" to protect all incoming mail.
This page describes Step 3 of the procedure to integrate Microsoft 365 with "Acronis Email Security":

This page includes:
About configuring Microsoft 365
To enable your Microsoft 365 integration with "Acronis Email Security", some configurations must be made in your Microsoft 365 account. You can perform these configurations either:
-
automatically - using the script that is available at the end of the onboarding wizard
- or -
-
manually - as described below
Automatic configuration
You can use the automatic script to perform the required Microsoft 365 account configurations. This is the recommended way to perform these configurations.
-
For details on how to perform a manual configuration, see Manual configuration below.
|
Note:
|
To perform the required configurations automatically:
-
In the top-left of the "Acronis Email Security" banner, select the organization that you are onboarding.
-
Select Settings > Bundles and Channels.
-
Under Enabled Channels, locate Email Service, and then click Email service configuration [
 ] on the right.
The "Add and Configure Services" wizard opens.
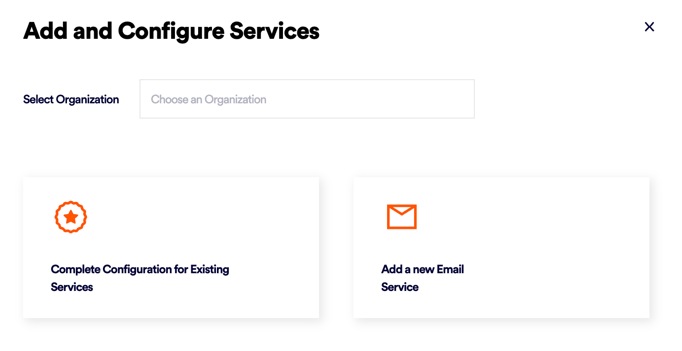
Note: If your domain is verified, and the "Add and Configure Services" wizard doesn't appear, refresh the page.
-
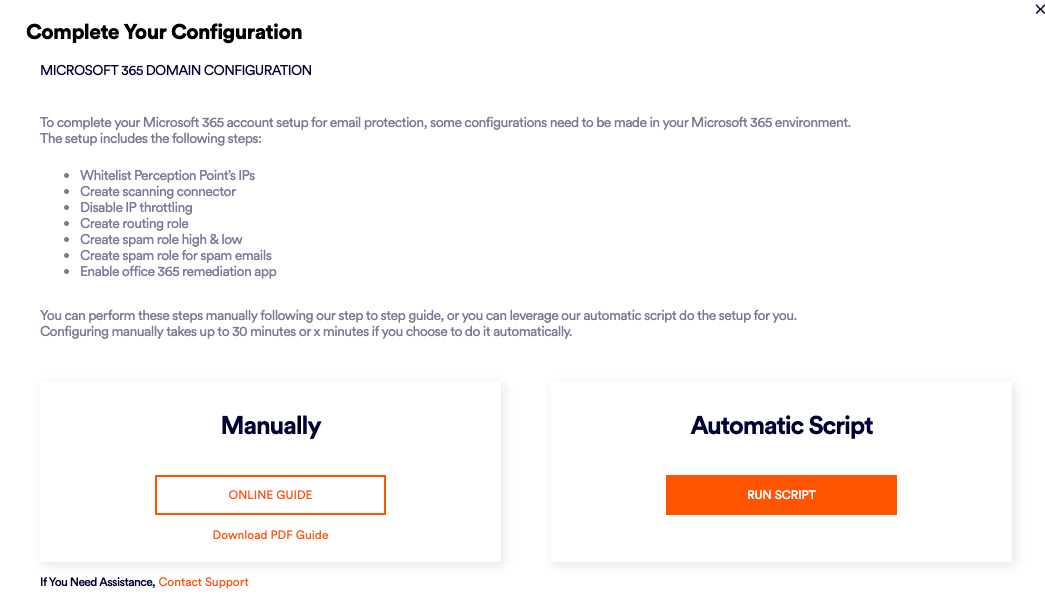
Click Complete configuration for existing services, locate and click your domain, and then click Next. The Complete your configuration dialog box opens.
Note: If you don't see the Complete configuration for existing services option, click Refresh in your browser.
-
Under Automatic Script, click Run Script.
Note: You must be a global administrator to run the script.
The script will begin to run, and soon the Granting Access dialog box will appear.

-
Granting Access:
-
Click the Copy icon [
 ] to copy the code that appears.
 -
Click the link that appears below: 2. Paste the code in the link below. The Enter Code pop-up opens.

Note: If the pop-up does not appear, make sure that pop-ups are not blocked on your computer.
-
-
Paste the code into the Code field, and click Next.
-
In the Pick an account dialog box that appears, click your Microsoft account.
Note: You must be a global administrator in that account.
A "confirmation required" dialog box opens.
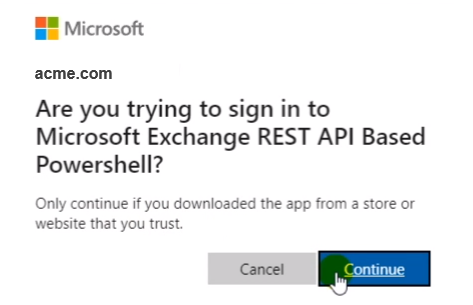
-
Click Continue. A "confirmation" dialog box opens.

-
Close the pop-up that contains the above message.

The automatic script will continue processing and setting the required configurations - in the background. This process will take about 10 minutes to complete. You can continue with other work on your computer while the script runs.
-
Click Enable configuration to close the "Authentication completed successfully" dialog box.
What's next
-
"Acronis Email Security" will send you an email to let you know when the configuration is complete. The email will indicate if the configuration was successful or not.
Important:
-
The email will be sent to the email address of the user that is signed-in to "Acronis Email Security".
-
The email should take about 10 minutes to arrive.
-
Your organization will be protected by "Acronis Email Security" only if the email indicates that the configuration was successfully performed.
-
-
If the email indicates that the script did not complete the configuration successfully, see Microsoft 365 Integration: Troubleshooting automatic onboarding.
Note: In the Settings > Bundles and Channels page, under Enabled Channels, Email Service should now appear as Active. If it appears as Inactive, contact "Acronis Email Security" Support [support@perception-point.io].

-
-
If you want to configure this Microsoft 365 integration to operate in monitoring mode, continue with Configuring monitoring mode below.
Manual configuration
Perform the procedures below to manually configure the Microsoft 365 integration with "Acronis Email Security".
-
For details on how to perform an automatic configuration using a script, see Automatic configuration above.
|
Note: The procedures below may differ slightly depending on the versions of the applications that you are using. |
Perform this step in Microsoft 365 Defender:
-
In Microsoft 365 Defender, go to this location: https://security.microsoft.com/antispam

-
In the edit Anti-spam inbound policy (Default) window on the right, scroll down and then click Edit actions.
-
In the Actions window that opens:
-
Under Spam, select "Move message to Junk Email folder"
-
Under High confidence spam, select "Move message to Junk Email folder"
-
Under Phishing, select "Move message to Junk Email folder"
-
Under High confidence phishing, select "Quarantine message"
-
-
Scroll down and click Save.
-
In Microsoft 365 Defender, go to this location: https://security.microsoft.com/tenantAllowBlockList?viewid=SpoofItem
-
Click (+) Add.
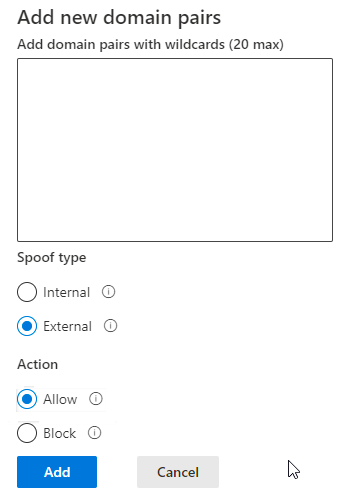
-
Add the "Acronis Email Security" IP addresses for the environment of your organization [see below].
Important: For each entry that you add, make sure to add "*," before the IP address - to create the required domain pairs. For example:
*,54.227.64.76
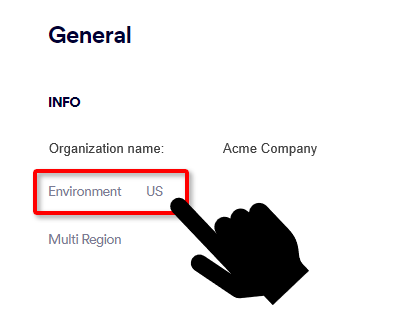
Note: Select the correct set of IP addresses for the environment of your organization. [Open the drop-down below for details on how to determine your environment.]
 What is the environment of your organization
-
In "Acronis Email Security", go to Settings > Account.
-
The Environment of your organization will appear under General > Info: US, EU, or AUS.
For US environments
For EU environments
For AUS environments
-
3.81.182.154
-
3.93.155.149
-
3.95.118.12
-
3.95.142.181
-
54.227.64.76
-
189.25.64.0/24
-
52.12.169.124 [required only if Muti-region is enabled]
-
99.81.216.78
-
34.249.190.60
-
108.128.137.108
-
99.80.189.20
-
176.23.157.0/24
-
52.12.169.124 [required only if Muti-region is enabled]
-
13.236.255.231
-
54.66.125.250
-
176.23.158.0/24
-
52.12.169.124 [required only if Muti-region is enabled]
Select-and-Copy below

*,3.81.182.154
*,3.93.155.149
*,3.95.118.12
*,3.95.142.181
*,54.227.64.76
*,189.25.64.0/24
*.52.12.169.124Select-and-Copy below
*,99.81.216.78
*,34.249.190.60
*,108.128.137.108
*,99.80.189.20
*,176.23.157.0/24
*.52.12.169.124Select-and-Copy below
*,13.236.255.231
*,54.66.125.250
*,176.23.158.0/24
*.52.12.169.124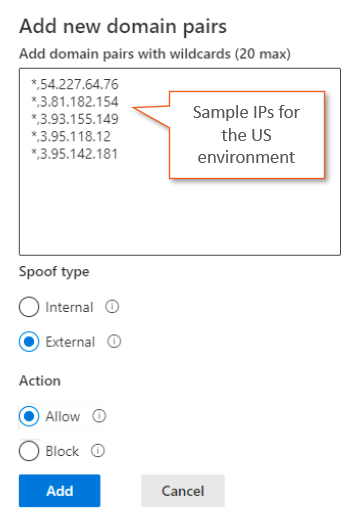
-
-
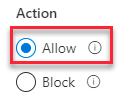
Make sure that under Action, Allow is selected.
For more information about the Tenant Allow/Block List, see the official Microsoft documentation
.
-
Open Microsoft Defender [the Microsoft 365 admin center].
-
Click Security > Policies & rules > Threat policies > Anti-spam policies > Connection filter policy (Default) > Edit connection filter policy.
[Click here: https://security.microsoft.com/antispam]
-
Add the IP addresses below to the Always allow messages from the following IP addresses or address range list.
Note: Select the correct set of IP addresses for the environment of your organization.
What is the environment of your organization
-
In "Acronis Email Security", go to Settings > Account.
-
The Environment of your organization will appear under General > Info: US, EU, or AUS.
For US environments
For EU environments
For AUS environments
-
3.81.182.154
-
3.93.155.149
-
3.95.118.12
-
3.95.142.181
-
54.227.64.76
-
189.25.64.0/24
-
52.12.169.124 [required only if Muti-region is enabled]
-
99.81.216.78
-
34.249.190.60
-
108.128.137.108
-
99.80.189.20
-
176.23.157.0/24
-
52.12.169.124 [required only if Muti-region is enabled]
-
13.236.255.231
-
54.66.125.250
-
176.23.158.0/24
-
52.12.169.124 [required only if Muti-region is enabled]
-
-
Select Turn on safe list.
-
Click Save.
This connector directs the email from your Microsoft 365 tenant to "Acronis Email Security".
- Open the Microsoft Exchange admin center, and then click Mail flow > Connectors > Add a connector.
[Click here: https://admin.exchange.microsoft.com/#/connectors]Connection from: Office 365

Connection to: Partner organization
-
Click Next.
-
Enter Name: Perception Point Scanning

-
Make sure that What do you want to do after connector is saved? > Turn it on is selected.
-
Click Next.
-
Select Only when I have a transport rule set up that redirects messages to this connector.

-
Click Next
-
Select Route emails through these smart hosts and add one of the following Amazon SES FQDNs, depending on the environment in which your organization is located: [Open the drop-down below for details on how to determine your environment.]
 What is the environment of your organization
-
In "Acronis Email Security", go to Settings > Account.
-
The Environment of your organization will appear under General > Info: US, EU, or AUS.
Multi-region enabled Multi-region not enabled For US environments
us.mx-pp.com
inbound-smtp.us-east-1.amazonaws.com
For EU environments
eu.mx-pp.com
inbound-smtp.eu-west-1.amazonaws.com
For AUS environments
australia.mx-pp.com
inbound-smtp.ap-southeast-2.amazonaws.com
-
-
Click Next.
-
Keep the default TLS settings.

Note that "Acronis Email Security" supports TLS 1.2
-
Click Next.
-
In the validation screen, use [and then validate] the following email address:
noreply@perception-point.io

-
Click Next, and then click Create connector.
This connector directs the email from "Acronis Email Security" back to your Microsoft 365 tenant.
- Open the Microsoft Exchange admin center and then click Mail flow > Connectors > Add a connector.
[Click here: https://admin.exchange.microsoft.com/#/connectors]Connection from: Partner organization

Connection to: Office 365
-
Click Next.
-
Enter: Name: Disable IP Throttling on Perception Point Connector

-
Make sure that What do you want to do after connector is saved? > Turn it on is selected.
-
Click Next.
-
Select the second option: By verifying that the IP address of the sending server matches one of the following IP addresses, which belong to your partner organization, and add one set of IP addresses below, depending on the environment in which your organization is located: [Open the drop-down below for details on how to determine your environment.]
 What is the environment of your organization
-
In "Acronis Email Security", go to Settings > Account.
-
The Environment of your organization will appear under General > Info: US, EU, or AUS.
For US environments
For EU environments
For AUS environments
-
3.81.182.154
-
3.93.155.149
-
3.95.118.12
-
3.95.142.181
-
54.227.64.76
-
189.25.64.0/24
-
52.12.169.124 [required only if Muti-region is enabled]
-
99.81.216.78
-
34.249.190.60
-
108.128.137.108
-
99.80.189.20
-
176.23.157.0/24
-
52.12.169.124 [required only if Muti-region is enabled]
-
13.236.255.231
-
54.66.125.250
-
176.23.158.0/24
-
52.12.169.124 [required only if Muti-region is enabled]
-
-
Click Next.
-
Leave the default TLS settings.
Note that "Acronis Email Security" supports TLS 1.2
-
Click Next.
-
Click Create connector.
In this step, you use a routing rule to define the users that will be protected by "Acronis Email Security".
-
In the Exchange admin center, click Mail flow > Rules > Add a rule > Create new rule.
[Click here: https://admin.exchange.microsoft.com/#/transportrules] -
Under Name, enter Perception Point Redirect Rule.

-
Specifying which users to protect [Microsoft 365 - Inline]
 For POC installations only
Note: It is possible to configure partial protection - protection of only a limited set of users in a Microsoft 365 account. Partial protection should be used for POC installations only. If partial protection is configured for an organization with a Commercial contract type, then billing will be based on the number of licenses that are included in the Microsoft 365 account - not on the number of "partial protection" users. See Integration - License source [Microsoft 365 / Microsoft Collaboration].
For details on how to configure partial protection, see Modifying the list of users to protect [Microsoft 365 - Inline] - POC only.
Under Apply this rule if, select:
"The recipient" > domain is. Add only domains that have verified TXT records.

 See the available video.
 -
Click "+" to add a condition.
-
Select The sender > is external/internal.
-
In the "select recipient location" box that appears, select Outside the organization - and then click Save.

-
Under Do the following, select Redirect the message to > the following connector > and then select the Perception Point Scanning connector that you created above.

-
Click "+" to add another condition.
-
Select Modify the message properties > set a message header
-
Message header: X-PERCEPTION-POINT-CUSTOM
-
Value: <Any value>, for example: acme2023
You'll need to enter this value later on in this procedure [in Step 10].

-
-
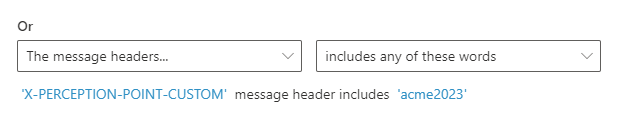
Under Except if, select The message headers... > includes any of these words
-
Message header: X-PERCEPTION-POINT-CUSTOM
-
message header includes: <The value that you entered in Step 9 above>
-
-
Click "+" to add an exception.
-
Select The sender > IP address is in any of these ranges or exactly matches, and enter one set of IP addresses below, depending on where the environment of your organization is located:
 What is the environment of your organization
-
In "Acronis Email Security", go to Settings > Account.
-
The Environment of your organization will appear under General > Info: US, EU, or AUS.
For US environments
For EU environments
For AUS environments
-
3.81.182.154
-
3.93.155.149
-
3.95.118.12
-
3.95.142.181
-
54.227.64.76
-
189.25.64.0/24
-
52.12.169.124 [required only if Muti-region is enabled]
-
99.81.216.78
-
34.249.190.60
-
108.128.137.108
-
99.80.189.20
-
176.23.157.0/24
-
52.12.169.124 [required only if Muti-region is enabled]
-
13.236.255.231
-
54.66.125.250
-
176.23.158.0/24
-
52.12.169.124 [required only if Muti-region is enabled]
-
-
Click "+" to add an exception.
-
Select The message > size is greater than or equal to, and then add a size limit of 40000KB.
-
Click Next.
-
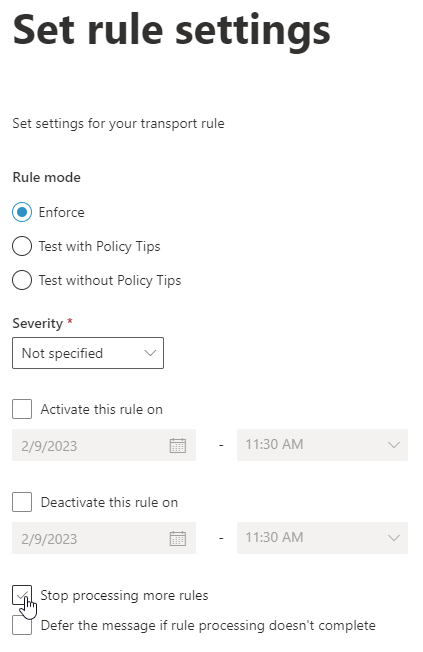
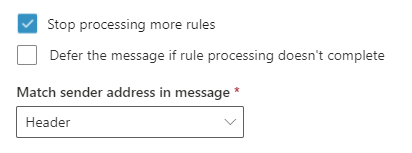
Under Set rule settings, select "Stop processing more rules".
-
Under Match sender address in message, select Header.
-
Click Next.
-
Change the priority to 0 (highest priority).
If you have existing block using IP rules, set the priority of this rule higher than Perception Point, and then select "Stop processing more rules"
-
Save the changes.
-
Review the rule and click Finish.
-
Select and then enable the rule.
|
Note: This step is optional. This step is not included in the automated script. |
If an email is identified by Microsoft's Exchange Online Protection (EOP) as being high-confidence spam (the SCL is 7, 8, or 9), then this rule sets the SCL to 9. This will cause all emails that are assigned a clean verdict by "Acronis Email Security" and a high spam confidence level by EOP, to be sent to the Junk Email folder or quarantined [depending on your Microsoft Exchange settings]. In this manner, Microsoft's (EOP) supplements "Acronis Email Security", offering an additional layer of protection.
-
In the Exchange admin center click Mail flow > Rules > Add a rule > Create a new rule.
[Click here: https://admin.exchange.microsoft.com/#/transportrules] -
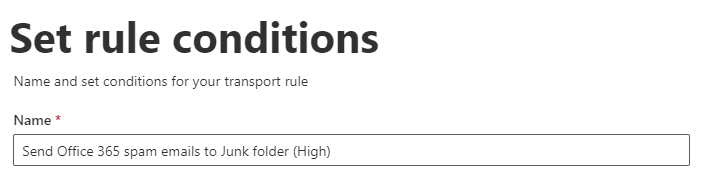
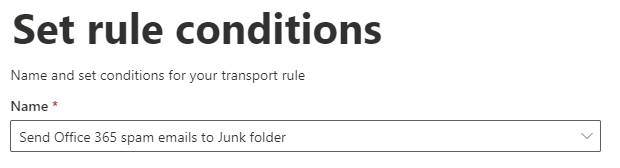
Under Name, enter Send Office 365 spam emails to Junk folder (High).
-
Under Apply this rule if:
-
Select The message headers... > matches these text patterns
-
Click Enter text, and then enter X-PP-Forefront-Antispam-Report
-
Select Enter text patterns, and then enter SCL:9
-
Click "+"
-
Click Enter text, and then enter X-PP-Forefront-Antispam-Report
-
Select Enter text patterns, and then enter SCL:8
-
Click "+"
-
Click Enter text, and then enter X-PP-Forefront-Antispam-Report
-
Select Enter text patterns, and then enter SCL:7

-
-
-
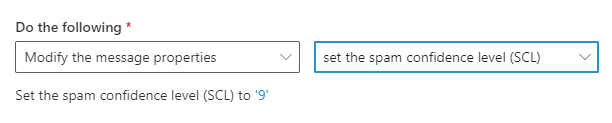
Under Do the following, select Modify the Message Properties > Set the spam confidence level (SCL) to, and then enter 9.
-
Click Next.
-
Click Finish.
|
Note: This step is optional. This step is not included in the automated script. |
If an email is identified by Microsoft's Exchange Online Protection (EOP) as being low-confidence spam (the SCL is 5 or 6), then this rule sets the SCL to 6. This will cause all emails that are assigned a clean verdict by "Acronis Email Security" and a low spam confidence level by EOP, to be sent to the Junk Email folder or quarantined [depending on your Microsoft Exchange settings]. In this manner, Microsoft's (EOP) supplements "Acronis Email Security", offering an additional layer of protection.
-
In the Exchange admin center, click Mail flow > Rules > Add a rule > Create a new rule.
[Click here: https://admin.exchange.microsoft.com/#/transportrules] -
Under Name, enter Send Office 365 spam emails to Junk folder (Low).
-
Under Apply this rule if:
-
Select The message headers... > matches these text patterns
-
Click Enter text, and then enter X-PP-Forefront-Antispam-Report
-
Click Enter text patterns, and then enter SCL:6, SCL:5

-
-
-
Under Do the following, select Modify the message properties > set the spam confidence level (SCL) to, and then enter 6.

-
Click Next.
-
Click Finish.
-
In the Exchange admin center, click Mail flow > Rules >Add a rule > Create a new rule.
[Click here: https://admin.exchange.microsoft.com/#/transportrules] -
Under Name, enter Perception Point Spam Rule.

-
Under Apply this rule if:
-
Select The message headers... > matches these text patterns
-
Click Enter text, and then enter X-PERCEPTION-POINT-SPAM
-
Click Enter text patterns, and then enter FAIL

-
-
-
Under Do the following, select Modify the message properties > set the spam confidence level (SCL) to, and then enter 6.

-
Click Next.
-
Click Finish.
The spam will now be sent to the user’s Junk folder.
This step enables the "Acronis Email Security" remediation app. For details on the remediation app, see Remediation App.
-
In "Acronis Email Security", in the left navigation menu, select Settings > Bundles and Channels.
-
Under Enabled Channels, locate Email Service > Microsoft 365, and then click Activate.
A new browser tab will open, enabling you to sign-in to Microsoft 365.
-
Use the credentials of a global admin to sign in, review the required permissions, and then approve them.
Your incoming email is now scanned and protected by "Acronis Email Security". 
If you want to configure this Microsoft 365 integration to operate in monitoring mode, continue with Configuring monitoring mode below.
Configuring monitoring mode
|
Important: Perform this procedure only if you want your Microsoft 365 Inline integration to operate in monitoring mode. Monitoring mode is typically used for PoC implementations. In monitoring mode [also known as passive, silent, or detection mode], "Acronis Email Security" will not:
|
To configure the integration to operate in monitoring mode:
-
Open the Settings > Bundles and Channels page.
-
On the right, click Channel Settings.
-
Click Edit [
 ].
]. -
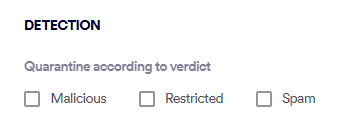
Under Detection, clear the Malicious, Restricted, and Spam check boxes.
Note:"Acronis Email Security" will not quarantine any malicious emails.
-
Click Save.
-
In the Exchange admin center, disable the following rules:
-
Perception Point Spam Rule
-
Send Office365 spam emails to junk folder (High)
-
Send Office365 spam emails to junk folder (Low)
Your Microsoft 365 Inline Integration is now configured to operate in monitoring mode.
"Acronis Email Security"will not quarantine any malicious emails or route spam to Junk folders.
-
See also:
