This page includes:
About banners
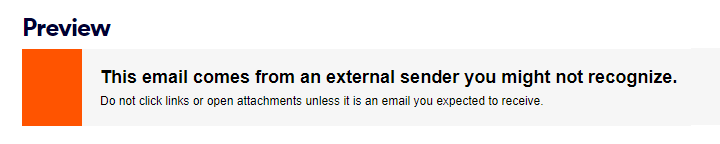
You can insert various banners (contextual banners) at the top of inbound emails. These banners indicate to the email recipients that there is a suspicion about the security of the email. For example, the banner below warns recipients to be cautious with emails that are sent from outside their organizations:

The standard "Acronis Email Security" banners are formatted with 2 lines of text, and a colored badge on the left side.
After an email is scanned by "Acronis Email Security", if relevant, the appropriate HTML-based banner is inserted by "Acronis Email Security" at the beginning of the email's body.
The Banners page lets you preview, edit, activate, and deactivate the banners.
To open the Banners page:
-
In "Acronis Email Security", in the left navigation menu, select Detection Setup > Banners.
|
Any admin user with the "Cyber Expert" role [or higher] can access the Banners page. |
Some more about banners
-
If you activate banners in a parent-organization, the banners will be activated in all child-organizations as well. If you want to activate banners for a specific child organization only, select that organization in the "Acronis Email Security" banner before activating the banner.
-
When you activate banners for an organization, DKIM checks may fail. See below: Required configurations after activating banners.
-
Banners are always added at the top of an email - they can't be added at the end of an email. Banners can't be relocated inside an email.
-
By default, banners may not be compatible with Exchange 2019. If you are using Exchange 2019, see below: Banners with Exchange 2019.
-
You can add banners to oncoming email only - not to outgoing email.
-
The "Acronis Email Security" banners support plain text [non-html] emails. For such emails, the banner text will be displayed as alternative text. Only the actual text will be displayed - all HTML formatting will be ignored.
-
Only one banner is added to any email. For details, see Multiple banners - What happens below.
-
When relevant, a banner is added to each new incoming email in an email chain - even if a similar banner was added to a previous incoming email in the chain.
Propagating banners from a parent organization to child organizations
Banner configurations that are activated in a parent organization are applied [propagated] to the child organizations as well. Therefore, for example, if you activate a particular banner in the parent organization, that banner will be activated in all the child organizations as well. The banners will also be applied to child organizations that are added after the banner is activated.
-
If you activate a specific banner in the parent organization and in a child organization, and the banners have different configurations, then the configuration of the parent organization will be applied.
-
If you want to activate and configure the settings of a banner for a specific child organization only, select that child organization in the "Acronis Email Security" banner before modifying the banner.
-
If you want to activate different configurations of the same banner in different child organizations, do not activate the banner in the parent organization. In stead, activate the required banners in the children orgaanizations.
|
Note: If you activate a custom banner in a parent organization, and a child organization has the default banner active, two banners may appear. |
Banner types
"Acronis Email Security" includes a set of banners. You can contact "Acronis Email Security" Support [support@perception-point.io] for information about additional banners.
|
Note: It is possible to exclude specific banners from specified external email addresses or domains. For details, see Limiting banner application below. |
The set of "Acronis Email Security" banners includes the following:
|
External |
Added when an email is sent from an address that is outside your organization.
|
|
|
External - First Time |
Added when an email is sent from an address that is outside your organization - and it is the first time that an email is sent from this address to the recipient.
|
|
|
Unscanned Password Protected |
Added when an email includes a password-protected file that was only partially scanned.
|
|
|
Display Name Deception |
Added when an email is sent from a user who appears to be impersonating someone in your organization.
|
|
|
Spoofed Domain |
Added when an email is sent from a domain that appears to be impersonating another domain. |
|
|
Different Origin |
Added when an email is sent by someone who is sending the email from a different path than is usually used by the sender.
|
|
|
SPF Hard Fail |
Added when an email is sent from an IP address that is not authorized for the domain from which it was sent. |
|
|
Newly Registered Domain |
Added when an email is sent form a domain that is newly registered - it was registered within the previous 6 months. |
|
|
Different Origin |
Added when an email is sent from someone who is sending the email from a different path [for example, IP, return path] than what what previously used. |
|
|
Financial |
Added when financial information is detected in an email. The financial information is detected in the body of the email, or in .pdf attachments only. For details, see Financial banners below. |

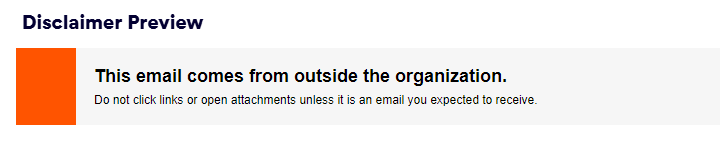
Previewing banners
You can preview any of the banners.
To preview a banner:
-
In "Acronis Email Security", in the left navigation menu, select Detection Setup > Banners.
-
Locate the banner that you want to preview, and then click Edit. A preview of the banner will be shown at the bottom of the editing pane.
Activating and deactivating banners
A banner may be added at the top of an incoming email only if the banner is active. You can activate or deactivate any of the banners.
|
Note:
|
To activate a banner:
-
In "Acronis Email Security", in the left navigation menu, select Detection Setup > Banners.
-
Locate the banner that you want to activate, and then click Activate.
To deactivate a banner:
-
In "Acronis Email Security", in the left navigation menu, select Detection Setup > Banners.
-
Locate the banner that you want to deactivate, and then click Deactivate.
Limiting banner application
It is possible to limit the application of banners in various ways. This is done by using allowlists - and is based on the banner type. For example, you could apply the "External-first-time" banner to all recipients in your organization, but exclude the banner from emails that are sent from a specified domain or email address. The specific allowlist requirements to implement the available options are described in the table below. You can add and configure allowlists in the Detection Setup > Allowlists & Blocklists page. For general information about allowlists, see Allowlists.
|
Note:
|
|
Scenarios for limiting the application banners |
Specific allowlist requirements |
|---|---|
|
|
|
|
|
|
Banners that can be excluded
Allowlists can be used to limit the application of the following banner-types:
-
Spoofed domain banners
-
External first time banners
-
New vector email banners
-
SPF hard fail banners
-
Unscanned password-protected email banners
-
Display name deception Email banners
-
External email banners
-
Newly domain registered banners
-
All banners
-
Macro in Attachment Banner
Editing [customizing] banners
You can edit the content and the design of any of the banners. Editing a banner may be useful, for example, if you want to change the language, text strings, size, height, or font of a banner.
You can also include dynamic variables in your customized banners.
You can include the following dynamic variables in your banners:
|
Dynamic variable |
Sample output |
|---|---|
|
{{ sender }} |
Peter Jones <PeterJones@example.com> |
|
{{ senderName }} |
Peter Jones |
|
{{ senderEmail }} |
PeterJones@example.com |
|
{{ senderEmailDomain }} |
example.com |
To edit a banner, you can use either the default editor or the HTML Editor.
To switch between the editors, use the toggle that is located on the right of the "Content and Design" header. [ ]
]
Default editor

Using the default editor, you can modify the following:
-
The text string that will appear in the first line of the banner, and the size of the text.
-
The text string that will appear in the second line of the banner, and the size of the text.
-
The background color that will appear behind all the text.
-
The color of the badge.
HTML editor
The HTML editor lets you specify additional configurations for a banner, including things such as text color, box border color, and box border thickness.
The following tags are allowed in the HTML code. All other tags will be removed from the HTML code when the code is saved:
-
table
-
tr
-
td
-
p
-
h3
-
b
-
br
-
div
-
h5
-
hr
-
i
-
span
-
strong
-
u
|
Important: Changes that you make in the HTML editor to elements that are not included in the default editor, are not copied to the default editor. The only changes made in the HTML editor that are copied to the default editor are the specific fields that appear in the default editor. Therefore, for example, if you use the HTML editor to change the text color to red, and then open the banner in the default editor, the text will be the default color - black. If you then save the banner in the default editor, the color change to red will be lost. |
|
|

To edit a banner:
-
In "Acronis Email Security", in the left navigation menu, select Detection Setup > Banners.
-
Locate the banner that you want to edit.
-
Click Edit - on the right of the banner.
The Edit Banner Content pane opens.
-
Make the required changes in the default editor.
or
Enable the HTML Editor toggle, and then make the required changes directly in the HTML source code.
-
Click Generate Preview to see how the banner will look when it is added on top of an email.
Note: Changes that you make in the default editor are not copied to the HTML editor - and vice-versa. Before you click Continue below, make sure that you are in the editor that has the version that you want to save.
-
Click Continue.
-
Click Save.
If the banner is active, then the modified banner will appear at the top of incoming emails - according to the applicable banner triggers.
Required configurations after activating banners
After you activate banners for your organization, DKIM checks may fail for any email that includes one of the banners. This may cause some emails to go mistakenly to spam. Make sure that your email configuration is as described below, so that this does not occur.
Microsoft 365
|
Note:
|
-
Open the Microsoft 365 admin center.
-
Click Security > Policies & rules > Threat policies > Anti-spam policies > Connection filter policy (Default) > Edit connection filter policy.
-
Make sure that the IP addresses that are shown below, appear in the Always allow messages from the following IP addresses or address range list.
Note: Select the correct set of IP addresses for the environment of your organization.
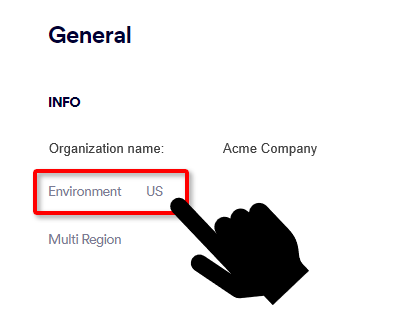
 What is the environment of your organization
-
In "Acronis Email Security", go to Settings > Account.
-
The Environment of your organization will appear under General > Info: US, EU, or AUS.
For US environments
For EU environments
For AUS environments
-
3.81.182.154
-
3.93.155.149
-
3.95.118.12
-
3.95.142.181
-
54.227.64.76
-
189.25.64.0/24
-
52.12.169.124 [required only if Muti-region is enabled]
-
99.81.216.78
-
34.249.190.60
-
108.128.137.108
-
99.80.189.20
-
176.23.157.0/24
-
52.12.169.124 [required only if Muti-region is enabled]
-
13.236.255.231
-
54.66.125.250
-
176.23.158.0/24
-
52.12.169.124 [required only if Muti-region is enabled]
-
-
Select Turn on safe list.
-
Click Save.
Google Workspace [G-Suite]
-
Go to Apps > Google Workspace > Gmail > Safety.
-
Clear the "Protect against any unauthenticated emails" check box.

Banners with Exchange 2019
If you are using Exchange 2019, you may need to perform the procedure below to activate banners to function correctly.
-
Locate the following Exchange 2019 xml application configuration file:
edgetransport.exe.config
-
Edit the file, adding the following:
key="DisableDetectEncodingFromMetaTag"
value="true"
-
Restart the transport service.
If necessary, contact "Acronis Email Security" Support [support@perception-point.io] for assistance.
Multiple banners - What happens
Each email receives only one banner, regardless of how many applicable banner conditions exist. In cases where multiple conditions are satisfied, the banner with the highest pre-defined priority is selected. The pre-defined priority is defined by "Acronis Email Security", and can't be changed.
Financial banners
A "Financial banner" will be added when financial information is detected in an email. The financial information is detected in the body of the email, or in .pdf attachments only.
Financial banners are added only if:
-
The email is from a suspicious sender.
-
An actual financial amount was detected.
The default text of the financial banner is "Financial information was detected in this email. Please review this information carefully and verify its legitimacy before taking any action." This can be modified. For details, see Editing [customizing] banners.
Limitations
When scanning is performed by the Microsoft 365 API integration, it make take a few minutes for banners to be added to an email - after the email first appears in the user's Inbox.
See also:
